› Members Forum › Kit Building › Locos › K’s Coal Tank rebuild
- This topic has 35 replies, 4 voices, and was last updated 3 years, 3 months ago by
 Nick Ridgway.
-
AuthorPosts
-
-
July 3, 2022 at 5:05 pm #241914
 Stuart FirthParticipant
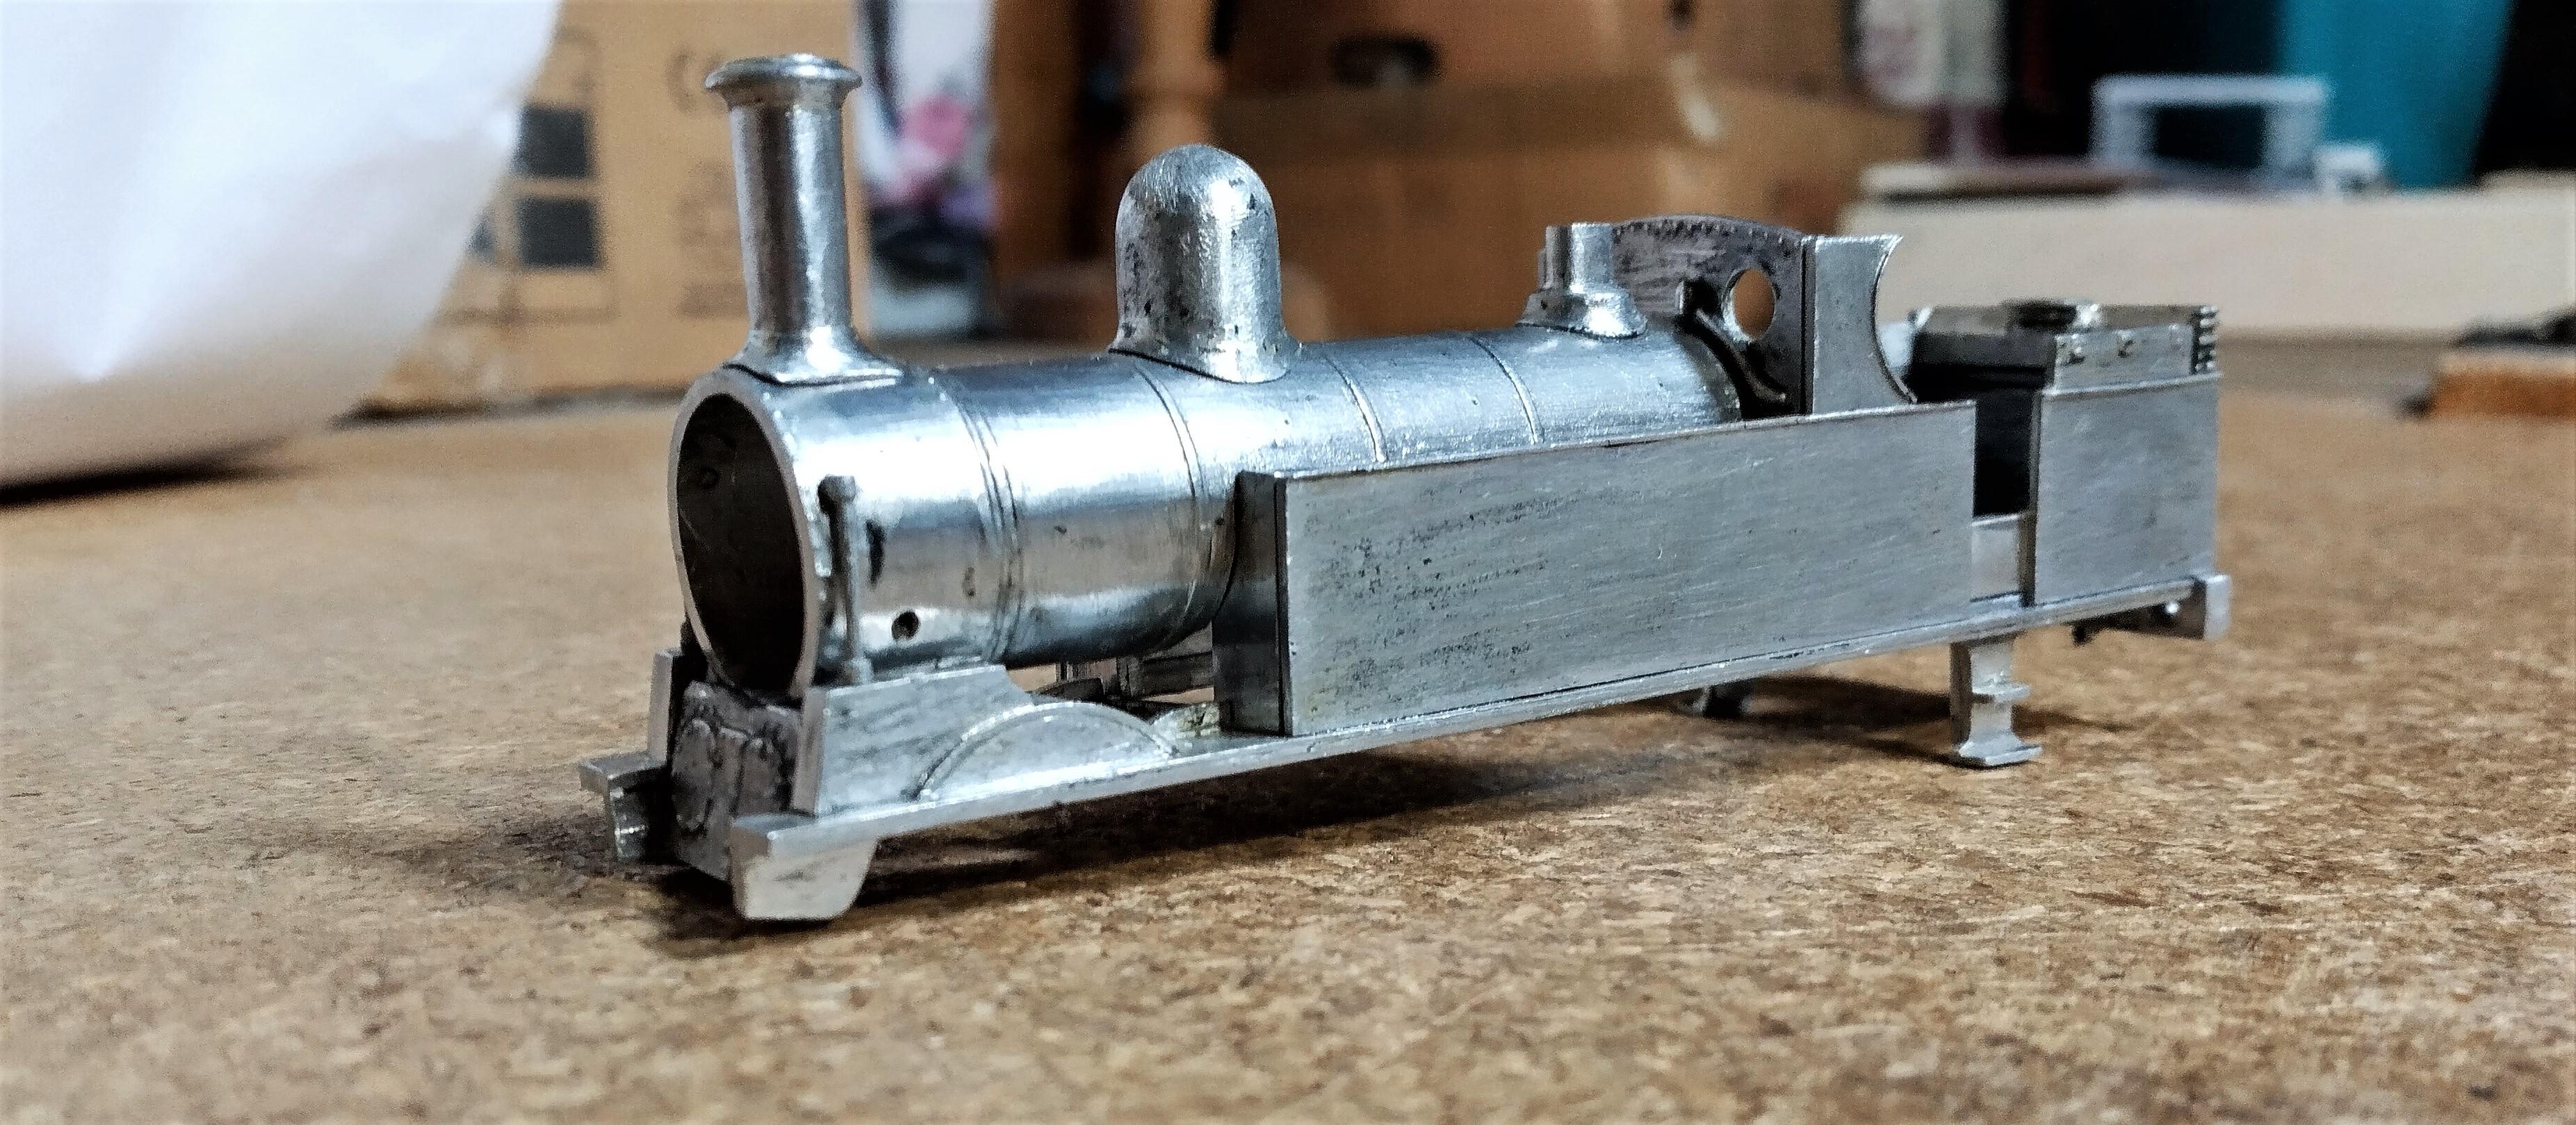
I bought this old K’s coal tank from ebay last year. It came for a decent price and included Romford wheels and new frames. Sadly one of the wheels turned out not to be a Webb wheel and I ordered a replacement from Markits. Also sadly the new wheels have a different crank throw from the old Romfords! In the end I took the hint and ordered new Gibson wheels. So what do I have? A nicely built coal tank which has been partly dismantled and stripped, presumably prior to a rebuild that never happened. I also have some after-market etched frames, which are much nicer than the old K’s ones would have been, but will still need work. To this I have added sprung buffers from Gibson, some Tri-ang Ross pop valves, a Markits whistle, some brake shoes from the scrap box, London Road Models cast hornblocks, which I haven’t tried before, a High Level gearbox (can’t remember which one), and a 1227 motor from Taff Vale Models, again something I haven’t tried before. Next time we’ll start building it – specification will be traditional with single beam compensation on the front 2 axles, and the trailing axle in a gun-barrel type bearing, free to swing as far as the frames will allow.

-
July 4, 2022 at 9:46 am #241916
 Nick RidgwayParticipant
It always surprises me the amount of replacement parts that are needed to get a heritage EM gauge loco up to a modern spec.
I suppose the displaced parts have a value to someone else, though. 🤔
-
July 5, 2022 at 8:03 am #241918Stuart FirthParticipant
Anyone need five Romford Webb wheels without axles or crankpins?😁
-
July 5, 2022 at 9:38 am #241919
 Trade OfficerKeymaster
I sometimes wonder at the price of heritage kits on ebay, given the additional cost and time it will take to bring them up to spec. But I suppose we like these challenges😎
John
-
July 30, 2022 at 8:40 pm #242395
 Nigel BurbidgeParticipant
Hi Stuart, I’ve just caught up with your list of ingredients and am wondering how the recipe is going?! Cheers Nigel
-
This reply was modified 3 years, 8 months ago by
 Nigel Burbidge.
-
This reply was modified 3 years, 8 months ago by
-
July 31, 2022 at 1:44 pm #242398Stuart FirthParticipant
Hi Nigel – it’s been too hot in the loft to do much work recently!
I have done some work to the frames, including making the cutouts for the hornblocks, have made up the hornblocks and made a gun barrel bearing for the trailing axle. Doesn’t look like much so I will save the next instalment for when the chassis frames have been assembled. I think to allow sufficient sideplay on the trailing axle I will need to cut the frames behind the rear drivers and assemble the rear part with thinner spacers, then attach it back to the main chassis.
-
August 14, 2022 at 12:27 pm #242545Stuart FirthParticipant
At last some progress. Hornblock cutouts for the front 2 axles, and some new brass spacers. The problem of sideplay for the rear trailing axle gave me some concern and in the end with heart in mouth I cut the back end off each frame, pre-assembled the rear parts with an old 00 gauge spacer, and then used some hefty brass strip to re-attach the 2 parts of the chassis. The rear part is now some 2mm narrower than the rest of the chassis so hopefully this will give sufficient sideplay. The big holes in the frames were for the intended turned 00 gauge spacers and will be filled before assembly.

-
August 14, 2022 at 1:39 pm #242546Nick RidgwayParticipant
Looking good, Stuart.
If, like my N7 class 0-6-2T, you are driving on the trailing axle, just allow a bit of sideplay on the middle and leading axles and let the spring of the pickups centre the wheels. Sounds counter-intuitive and it works.
-
August 15, 2022 at 7:04 pm #242562Nigel BurbidgeParticipant
That’s a very nice piece of work Stuart and I’m sure the extra tolerance will provide you with the side play you need. Coming on really well; I need to do something similar on my new F5 chassis as it won’t currently negotiate the curves on Elmham Market.
-
August 16, 2022 at 8:59 am #242565Stuart FirthParticipant
I have found loco’s with Radial and Bissel trucks very intolerant of curves. When I made a couple of N7 chassis for Roy Lowe, who has 2nd radius curves in his fiddle yard, I had to cut off the back end of the chassis and turn it into a pony truck!
The narrowing of the chassis will hopefully do the trick, I was reading Guy Williams’ old book recently and I think I saw it in there.
-
August 16, 2022 at 11:49 am #242570Nigel BurbidgeParticipant
Yes, I’ll have a crack at that on the F5 and let you know how I get on…
-
August 23, 2022 at 3:21 pm #242649Nick RidgwayParticipant
Test
-
August 25, 2022 at 11:54 am #242687Stuart FirthParticipant
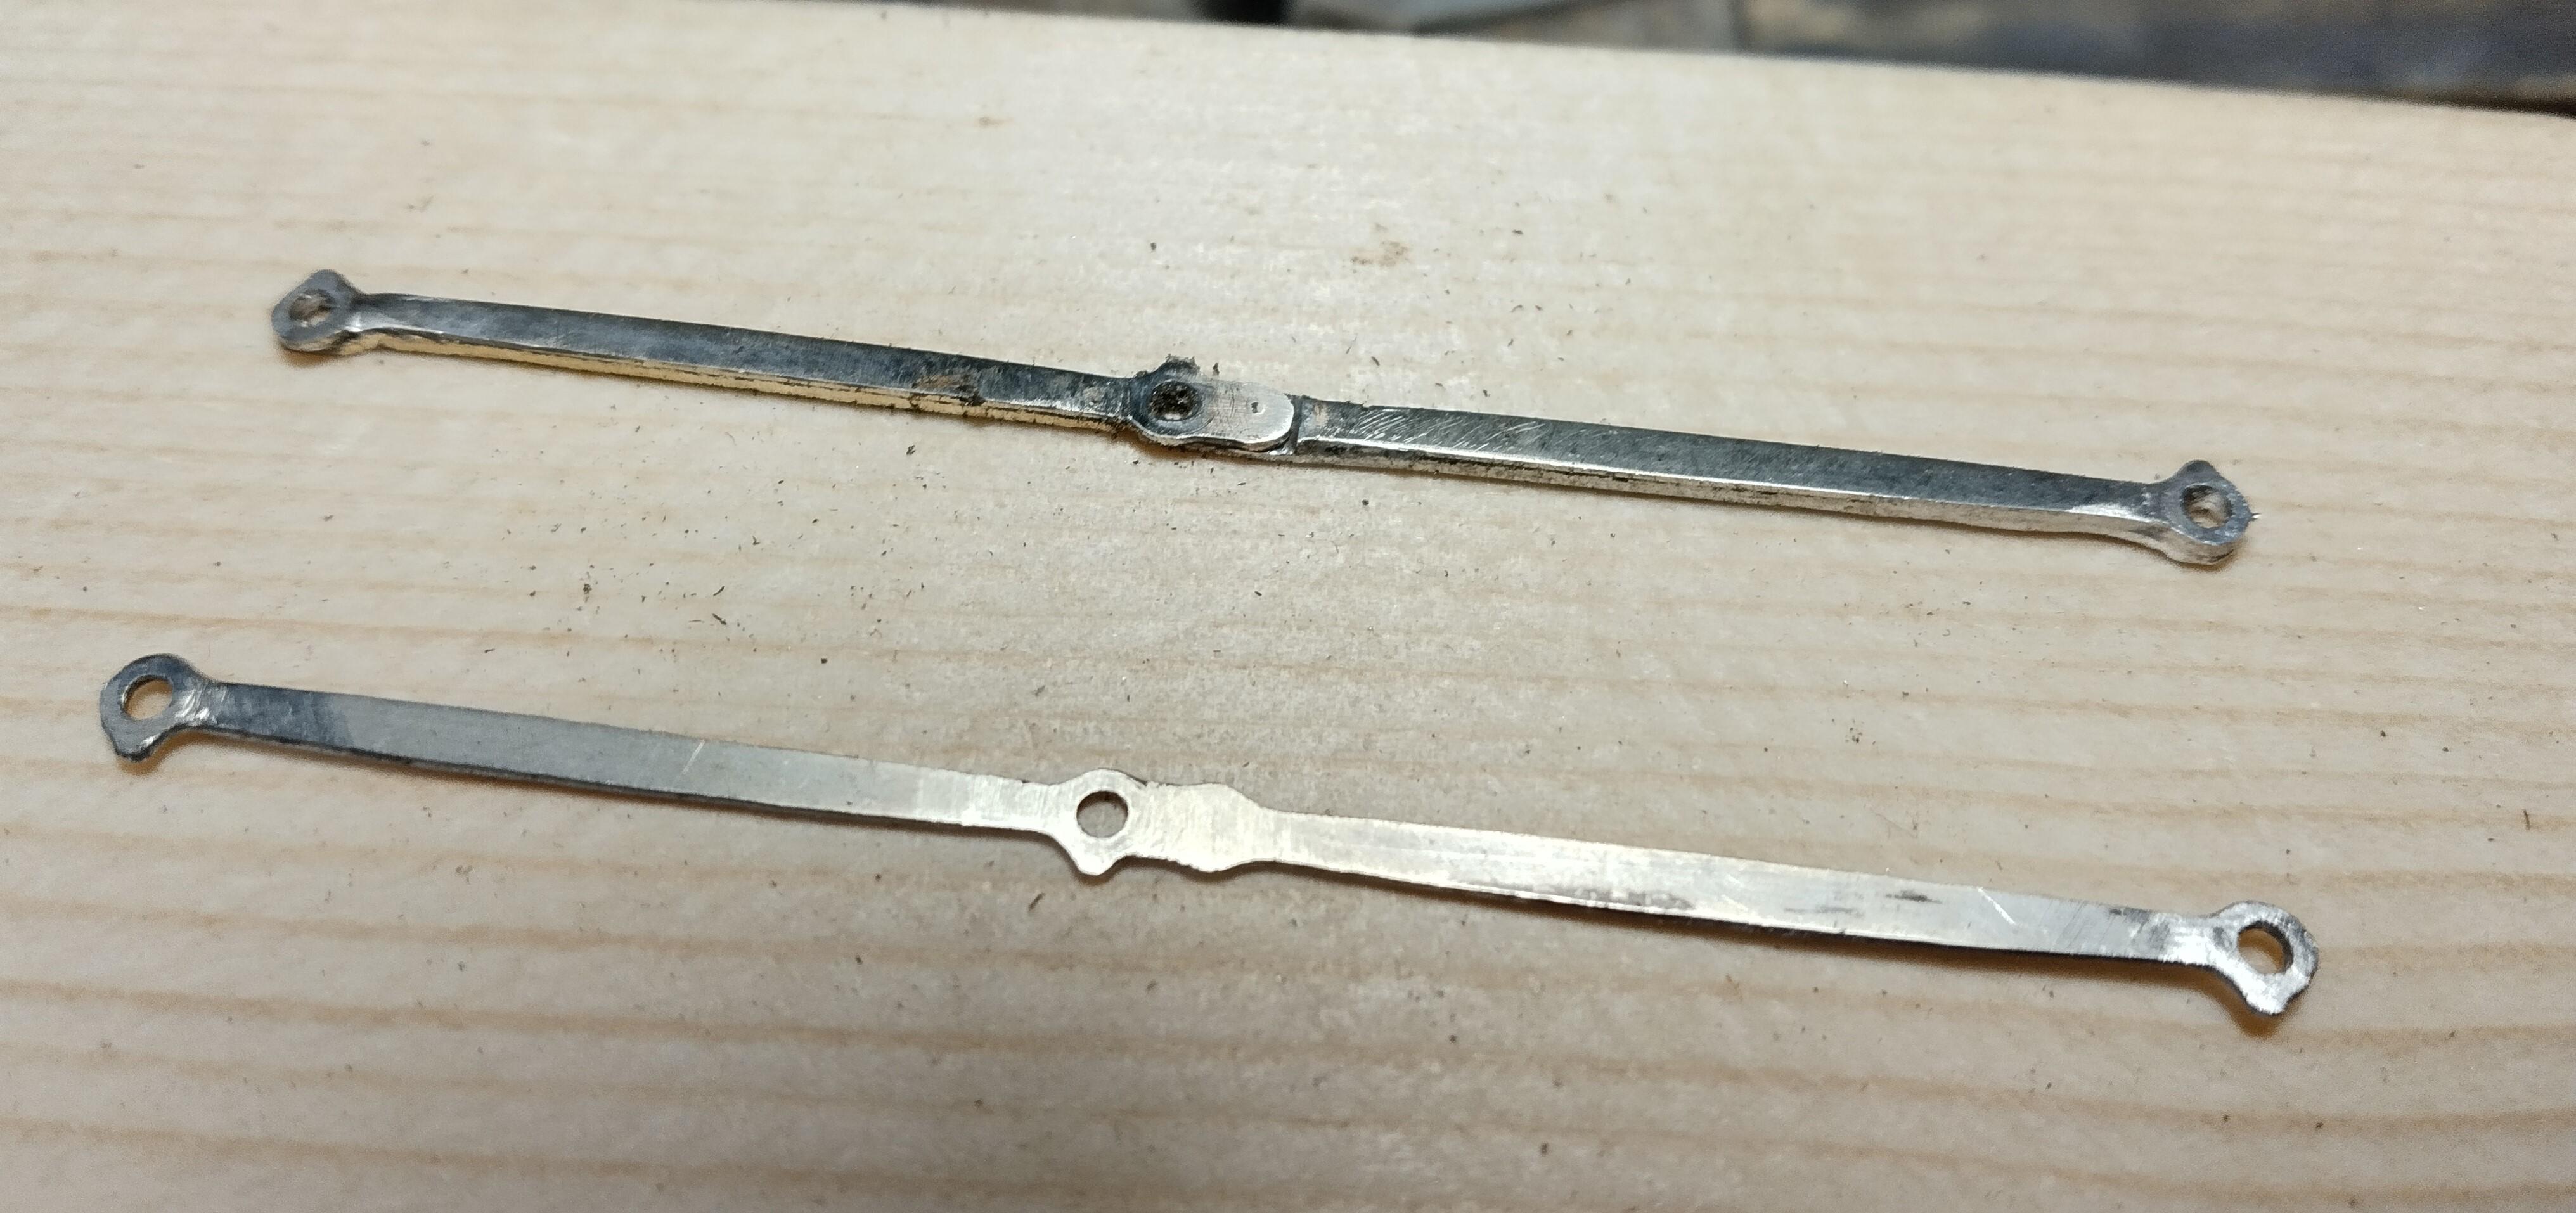
With apologies to modellers of a nervous disposition, the coupling rods have now been modified. A second layer of material was soldered to the back, which has enabled the rods to be cut and split, with a simple join on the centre crankpin. Shown with one modified and one as supplied.
-
August 25, 2022 at 11:13 pm #242689Nigel BurbidgeParticipant
That is undoubtedly an improvement and will produce more ‘give’ when negotiating curves, even if not for the faint hearted!
-
August 26, 2022 at 6:32 am #242690Nick RidgwayParticipant
Sounds like a good project for display at the demo stand at Shenfield, Stuart. 👍
-
August 26, 2022 at 9:05 am #242691Stuart FirthParticipant
It would be but they only had room for three this year so I’m sitting this one out; but will be there early to set up. Anyone in the area please visit the show, and say ‘hi’ to the guys on the stand – if no-one talks to them they might get some modelling done, and that would never do !
-
August 28, 2022 at 3:57 pm #242733Stuart FirthParticipant
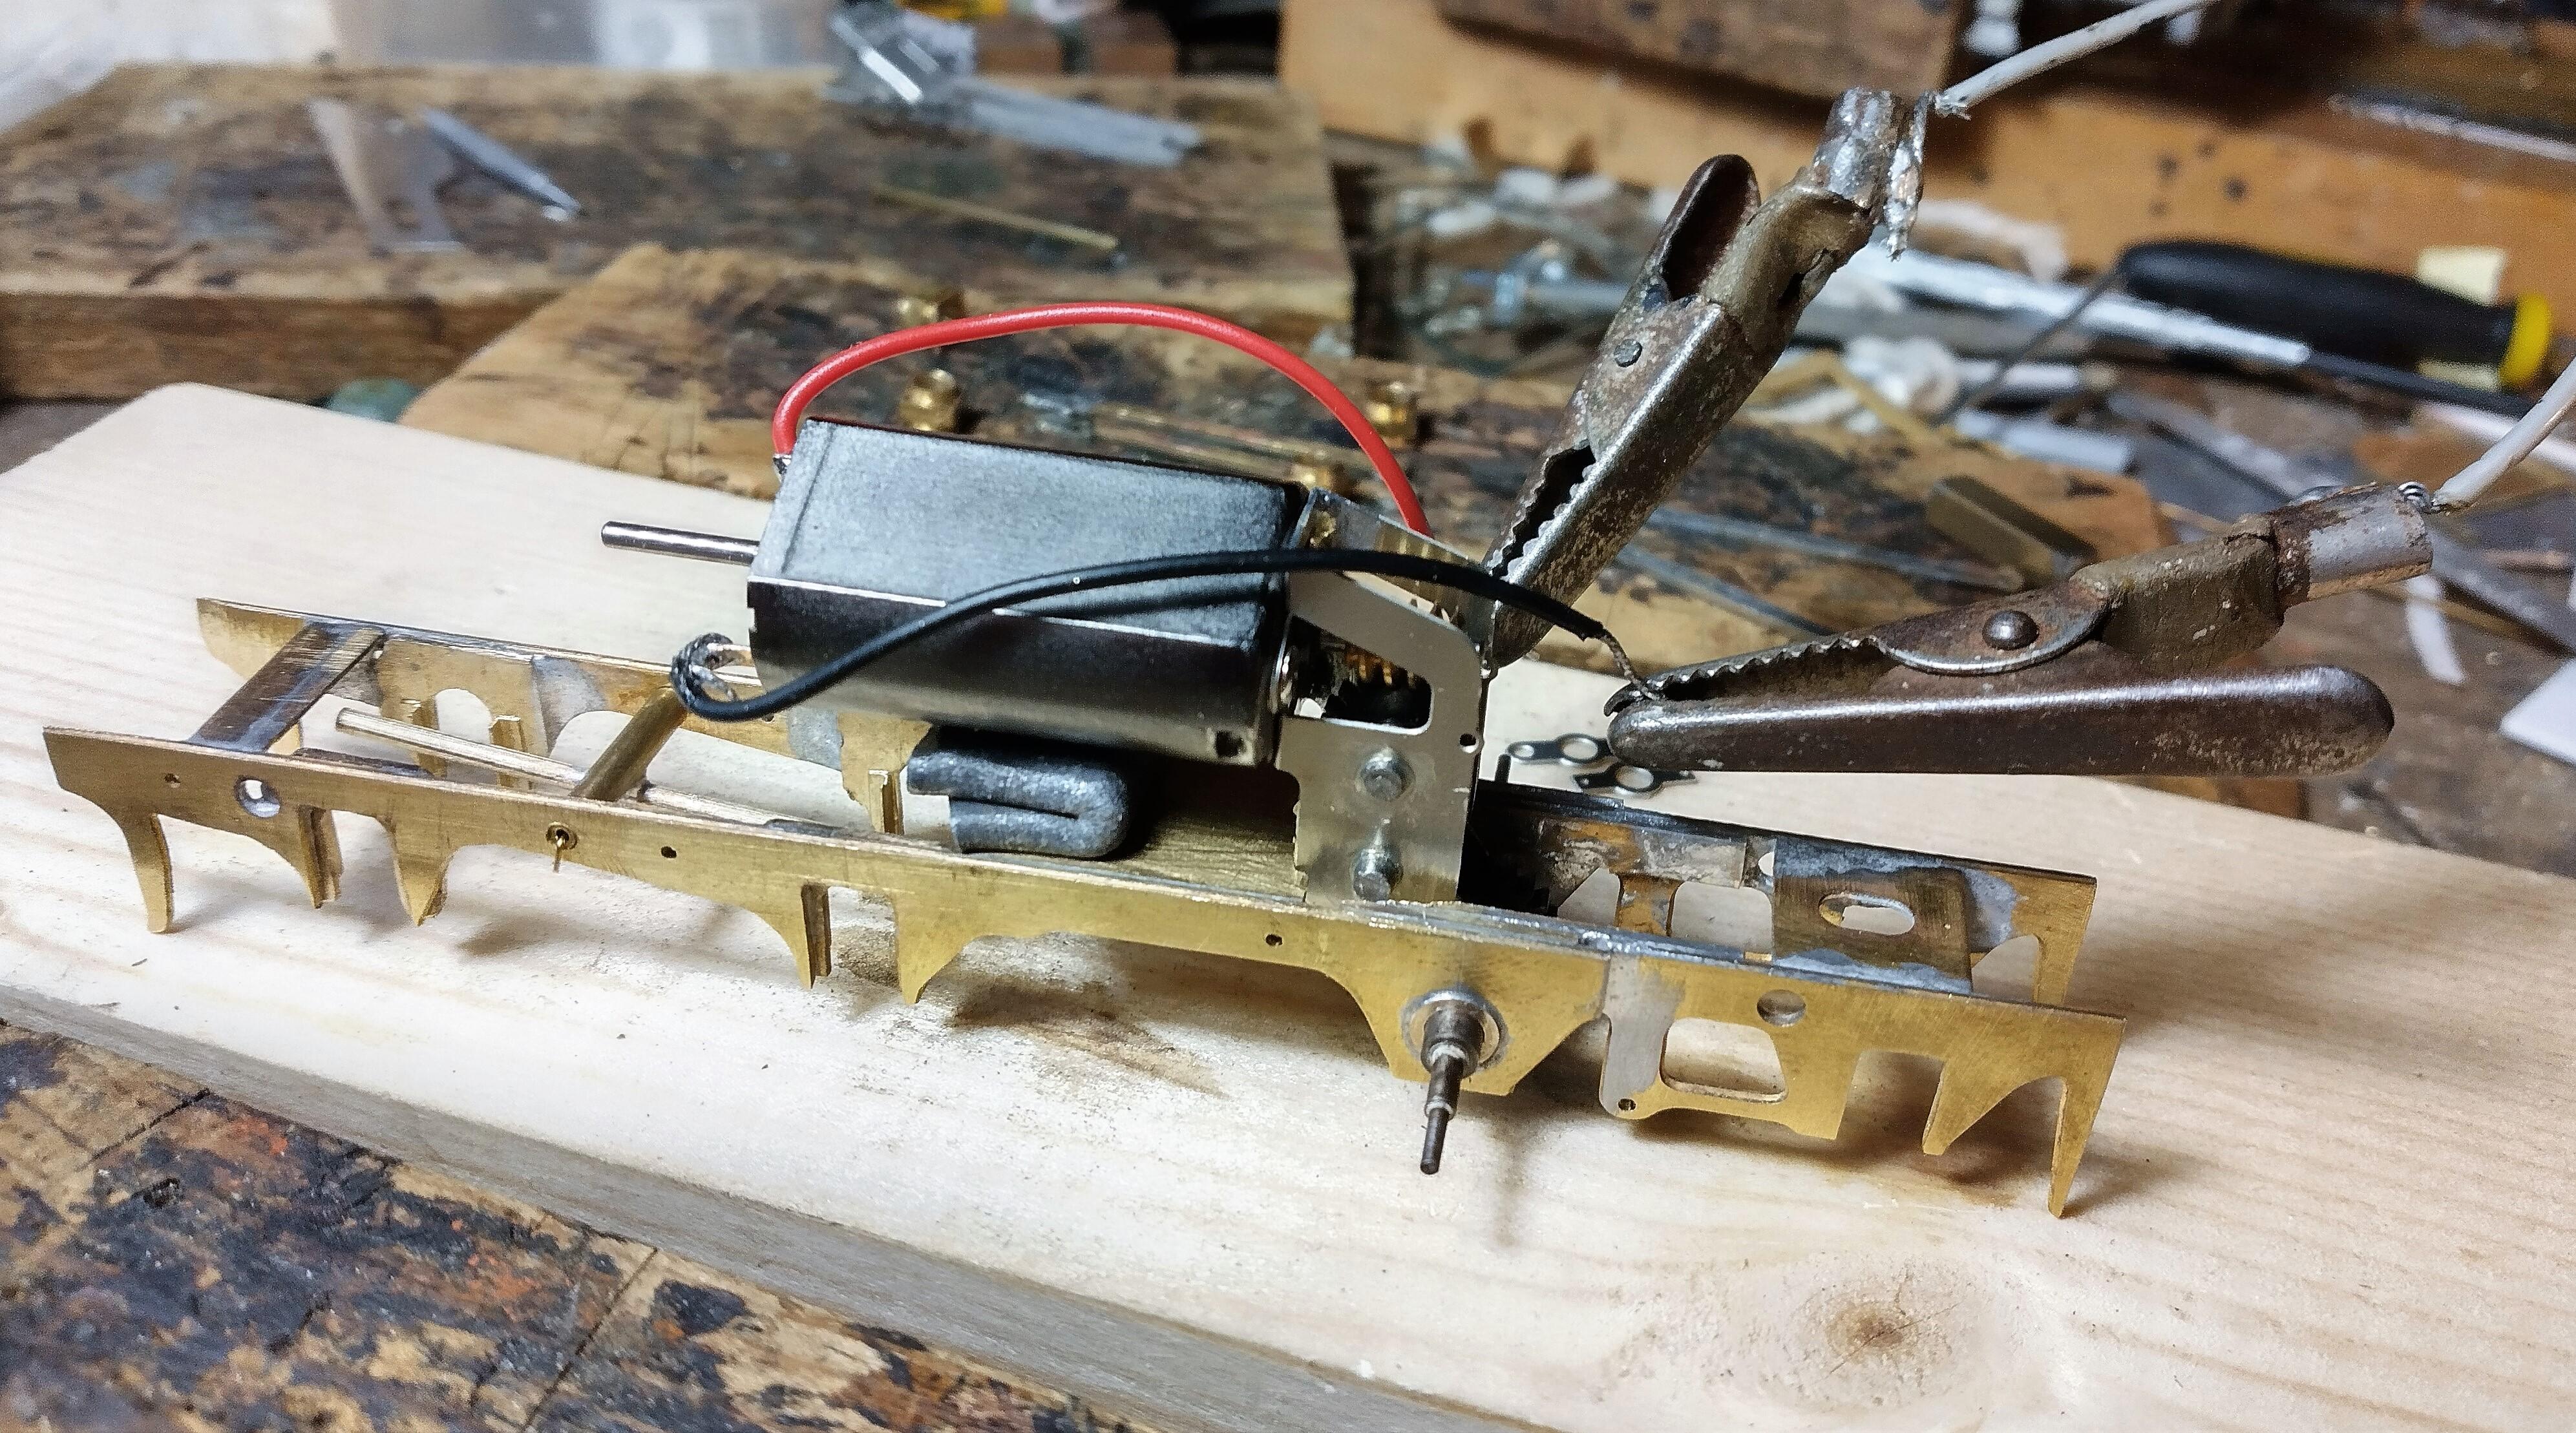
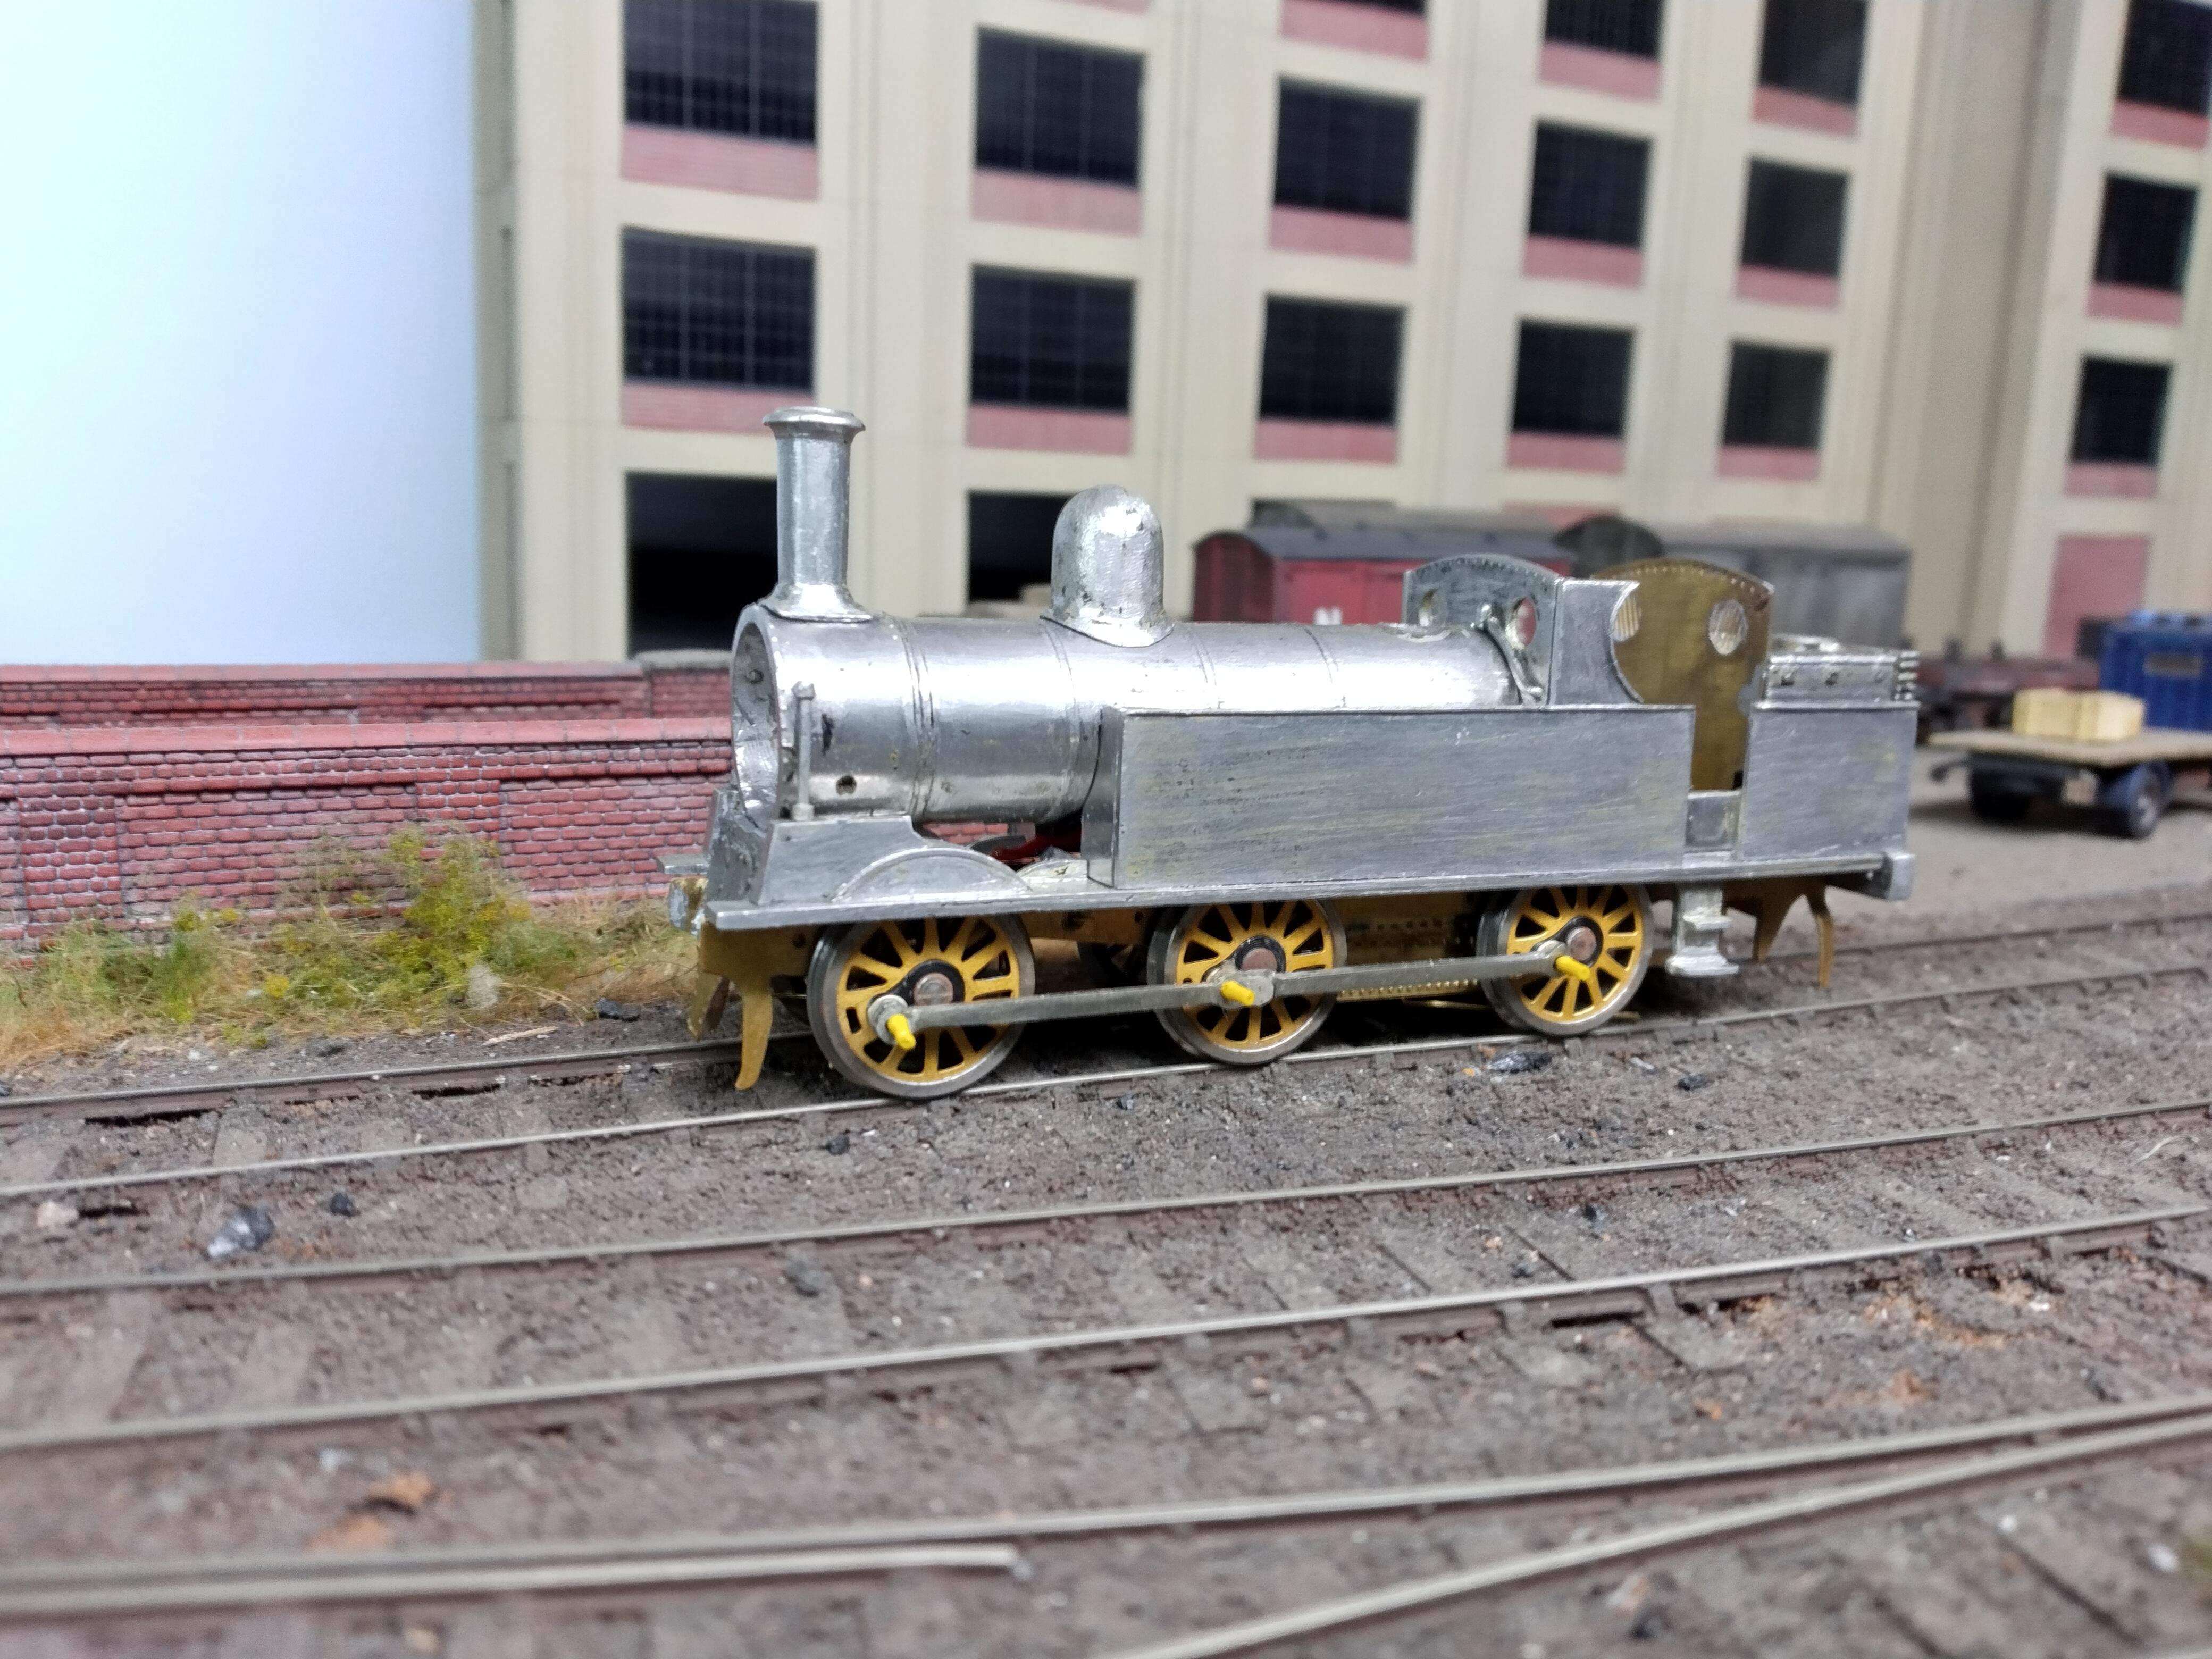
The London Road Models hornblock assemblies have now been installed using jig axles and the coupling rods to set their position. They had to be trimmed to prevent them spoiling the outline of these very open old-fashioned frames. Then the compensation beam and pivot were fitted, retained using a piece of fine wire so they could be removed in the future if required. The motor was run in and the High Level Road Runner Plus gearbox assembled. The Taff Vale Models motor has its screw holes in the same position as the Mitsumi motors I have used, which sets the motor at a diagonal angle instead of straight. Not a problem of course but it does look odd. I was pleased that the slim gearbox allows the outside mounting points to be used, so you can still access the screws when the gearbox has been assembled. All tested and running smoothly, but there’s more detail work planned for the chassis before it is wheeled up. There’s also a flywheel which looks like it will just fit.
The body reveals a fault which I believe is common to all K’s coal tanks – one side is longer than the other! I’m not sure whether to try to correct this or just assume it won’t be seen when the cab roof goes on.
-
August 28, 2022 at 5:39 pm #242735Nick RidgwayParticipant
I know there’s a siding at Saltport that turns 90deg well inside the width of the baseboard. Getting a coal tank round it would seem a bit ambitious… 😉
-
August 29, 2022 at 4:07 pm #242741Stuart FirthParticipant
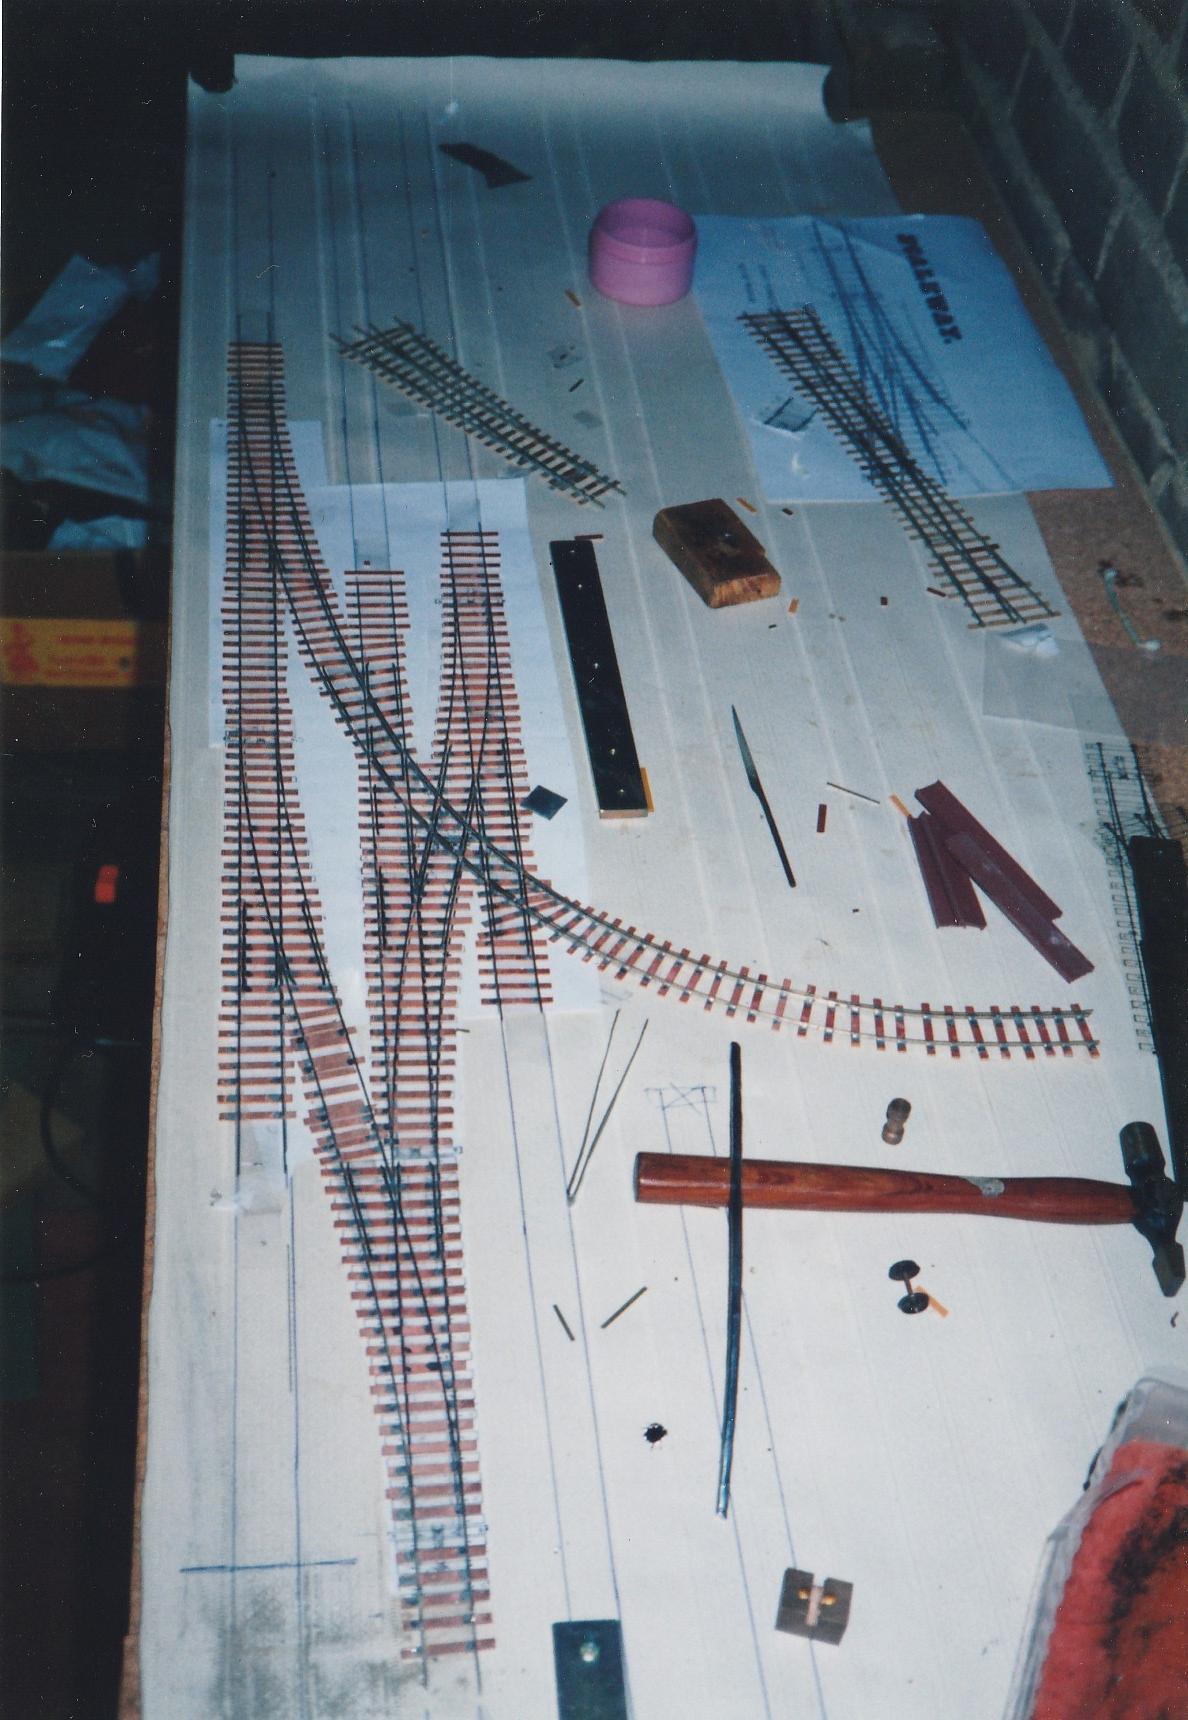
You mean this one? There’s only a select handful that will negotiate it !
Oh dear I’ve just submitted a picture of some copperclad 3′ radius points to someone who is highly knowledgeable about the details of real permanent way…
-
This reply was modified 3 years, 7 months ago by
 Stuart Firth.
-
This reply was modified 3 years, 7 months ago by
-
August 29, 2022 at 5:08 pm #242743Nick RidgwayParticipant
It’s all right, Stuart. Your secret is safe with me. 😉
-
September 12, 2022 at 4:28 pm #242953Stuart FirthParticipant
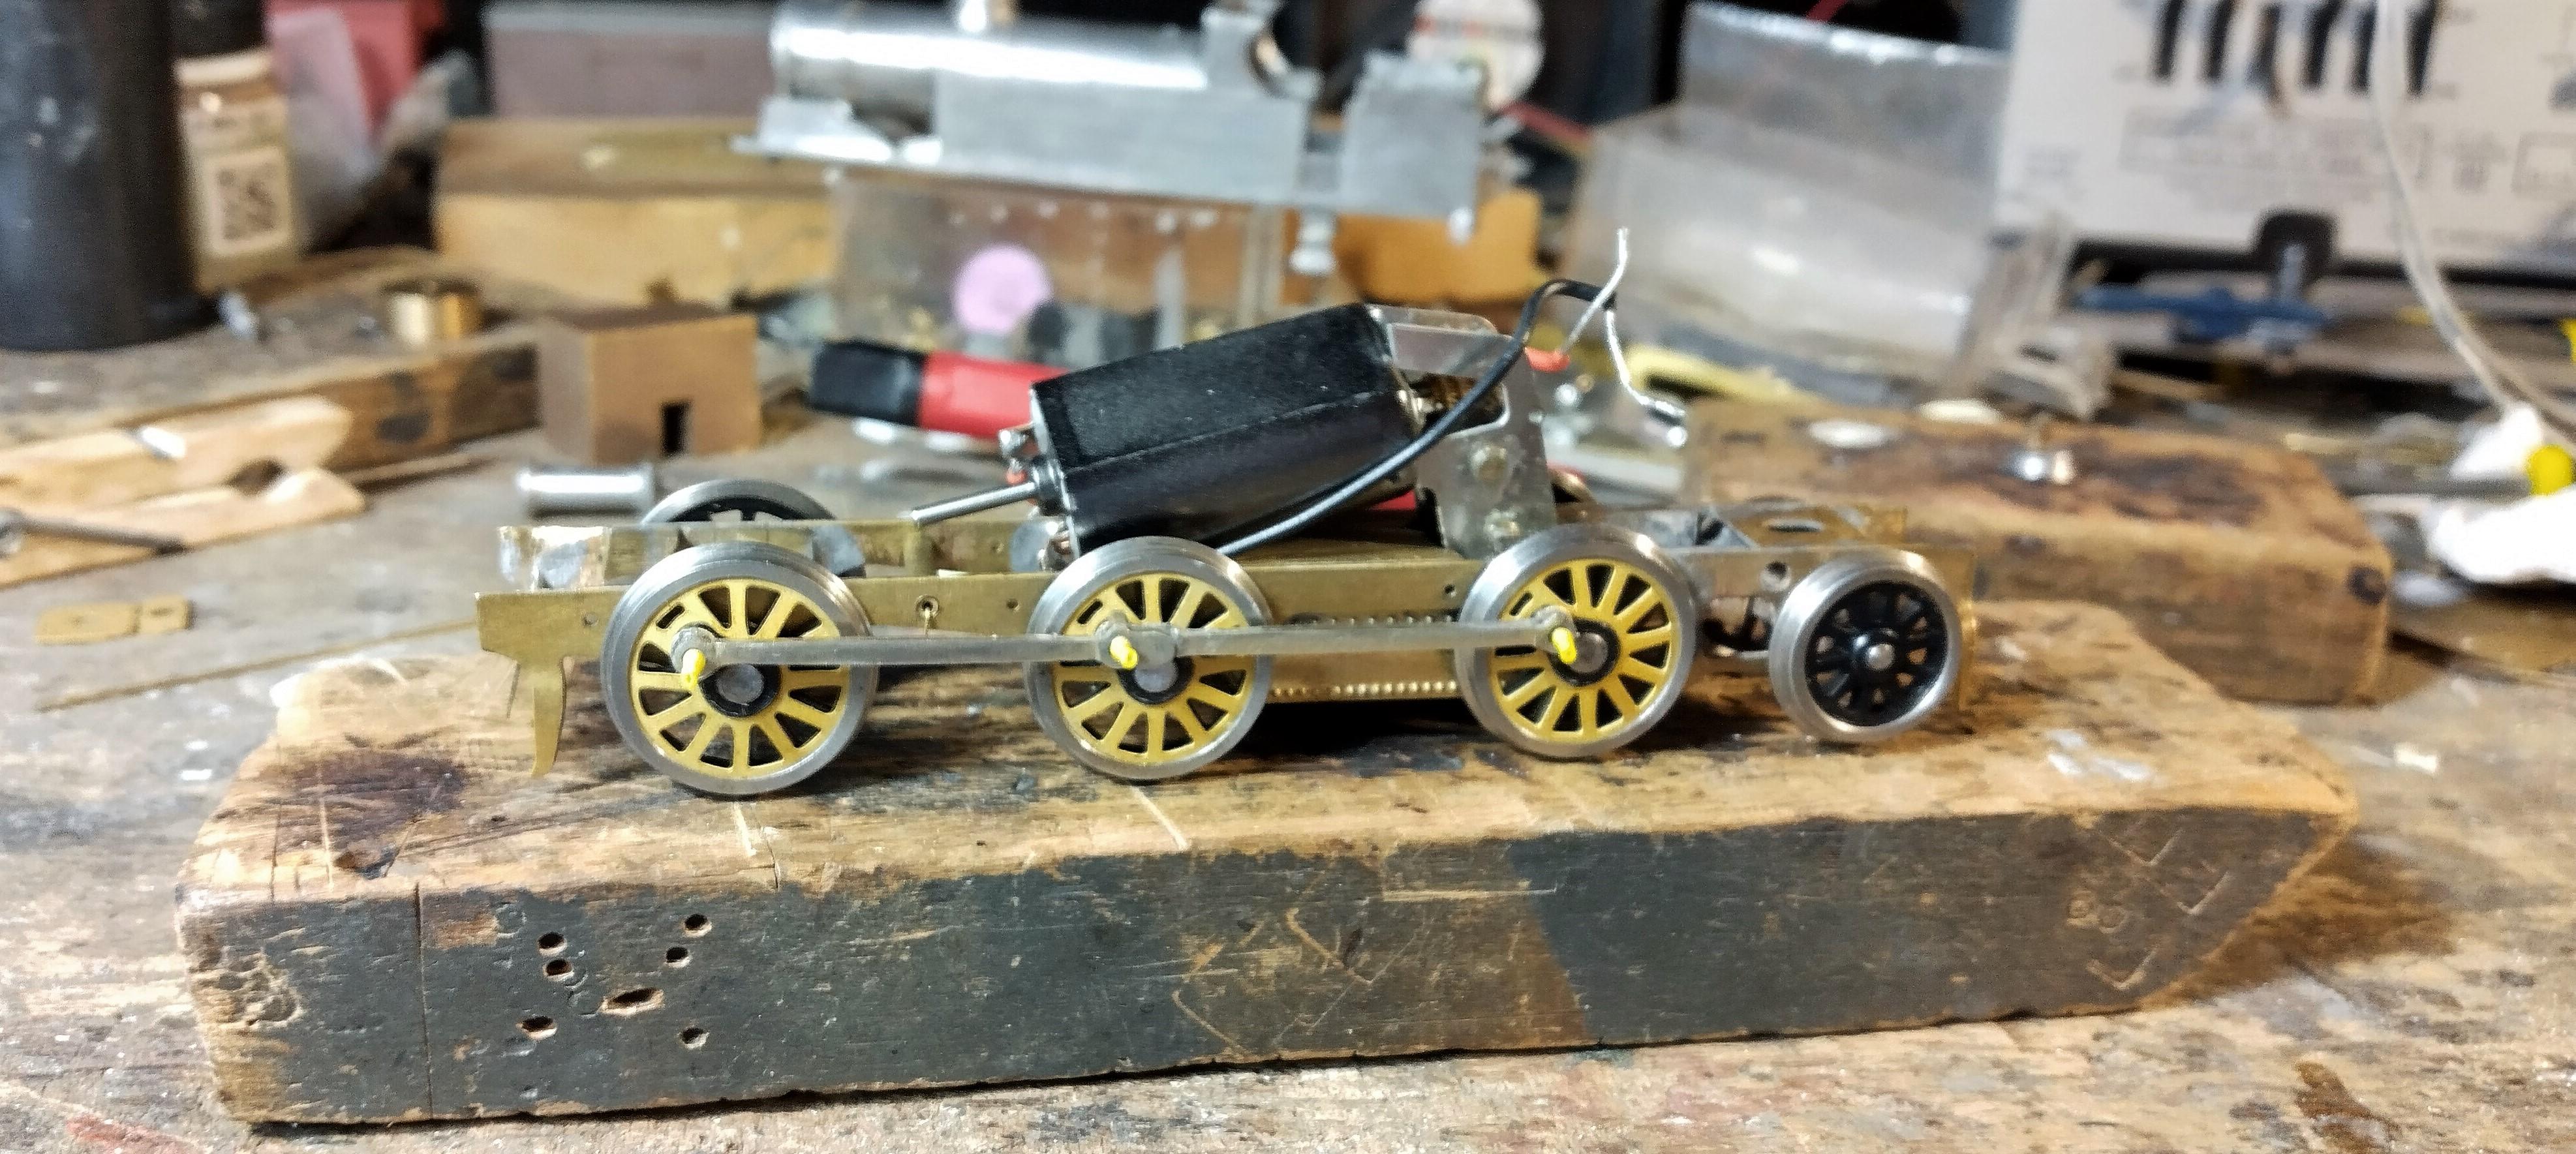
That biggest and most exciting moment of any loco. build is wheeling up and seeing if it works. Well, after a tweak of the quartering, it’s running very smoothly, so I’m happy!
The Gibson wheels needed drilling for the crankpins, as some do, but it went without a hitch, or a broken drill. The wheels gripped the axles very tightly so no Loctite on this one. Today the loco. moved under its own power up and down my short test track, on fly-leads. Pick-ups next, and I have to make a decision on the exact position of the motor in terms of fore/aft, and up/down; and whether the flywheel will scrape in or whether it will just scrape!
The trailing axle is located on a brass wire pivot, but it’s not very flexible or springy and may be changed. At the moment the chimney is loose, hence it is not very vertical in the picture.
The motor seems very sweet and quiet and the LRM horn blocks were very easy to use.
-
September 12, 2022 at 5:54 pm #242954Nigel BurbidgeParticipant
That’s all looking very good Stuart!
-
September 12, 2022 at 7:15 pm #242955Nick RidgwayParticipant
Following this, Stuart. Keep going!
-
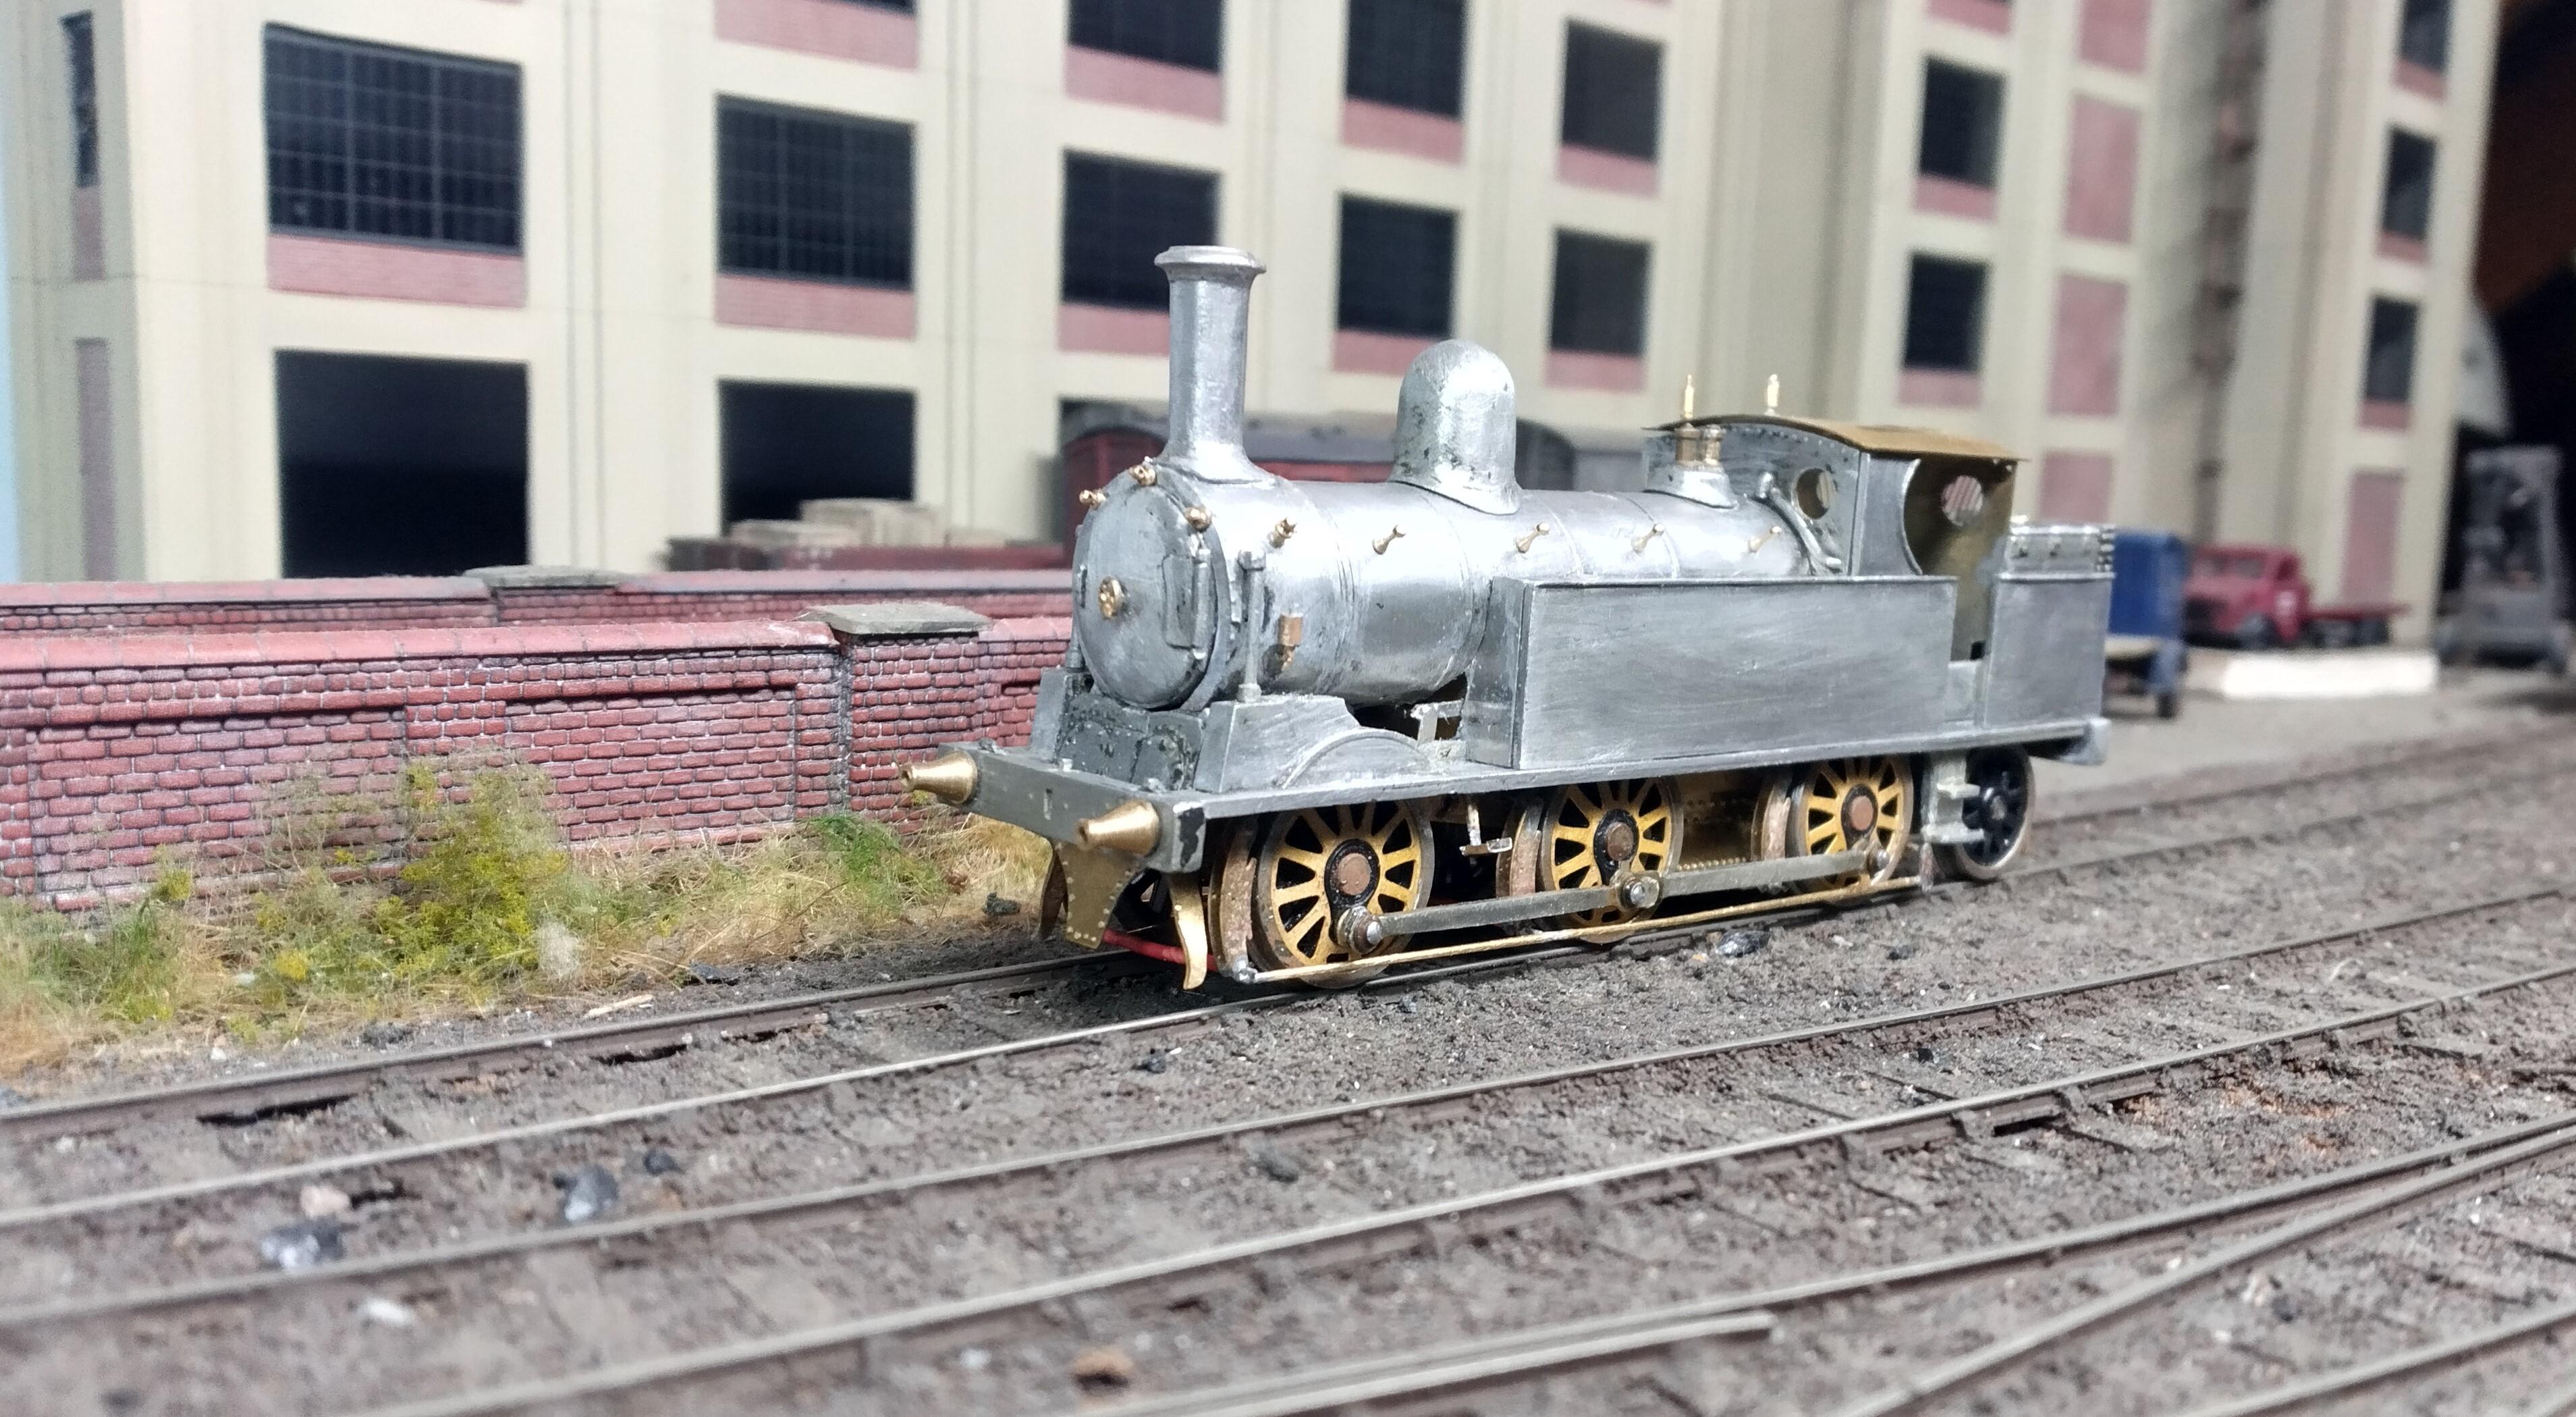
September 29, 2022 at 9:00 am #243059Stuart FirthParticipant
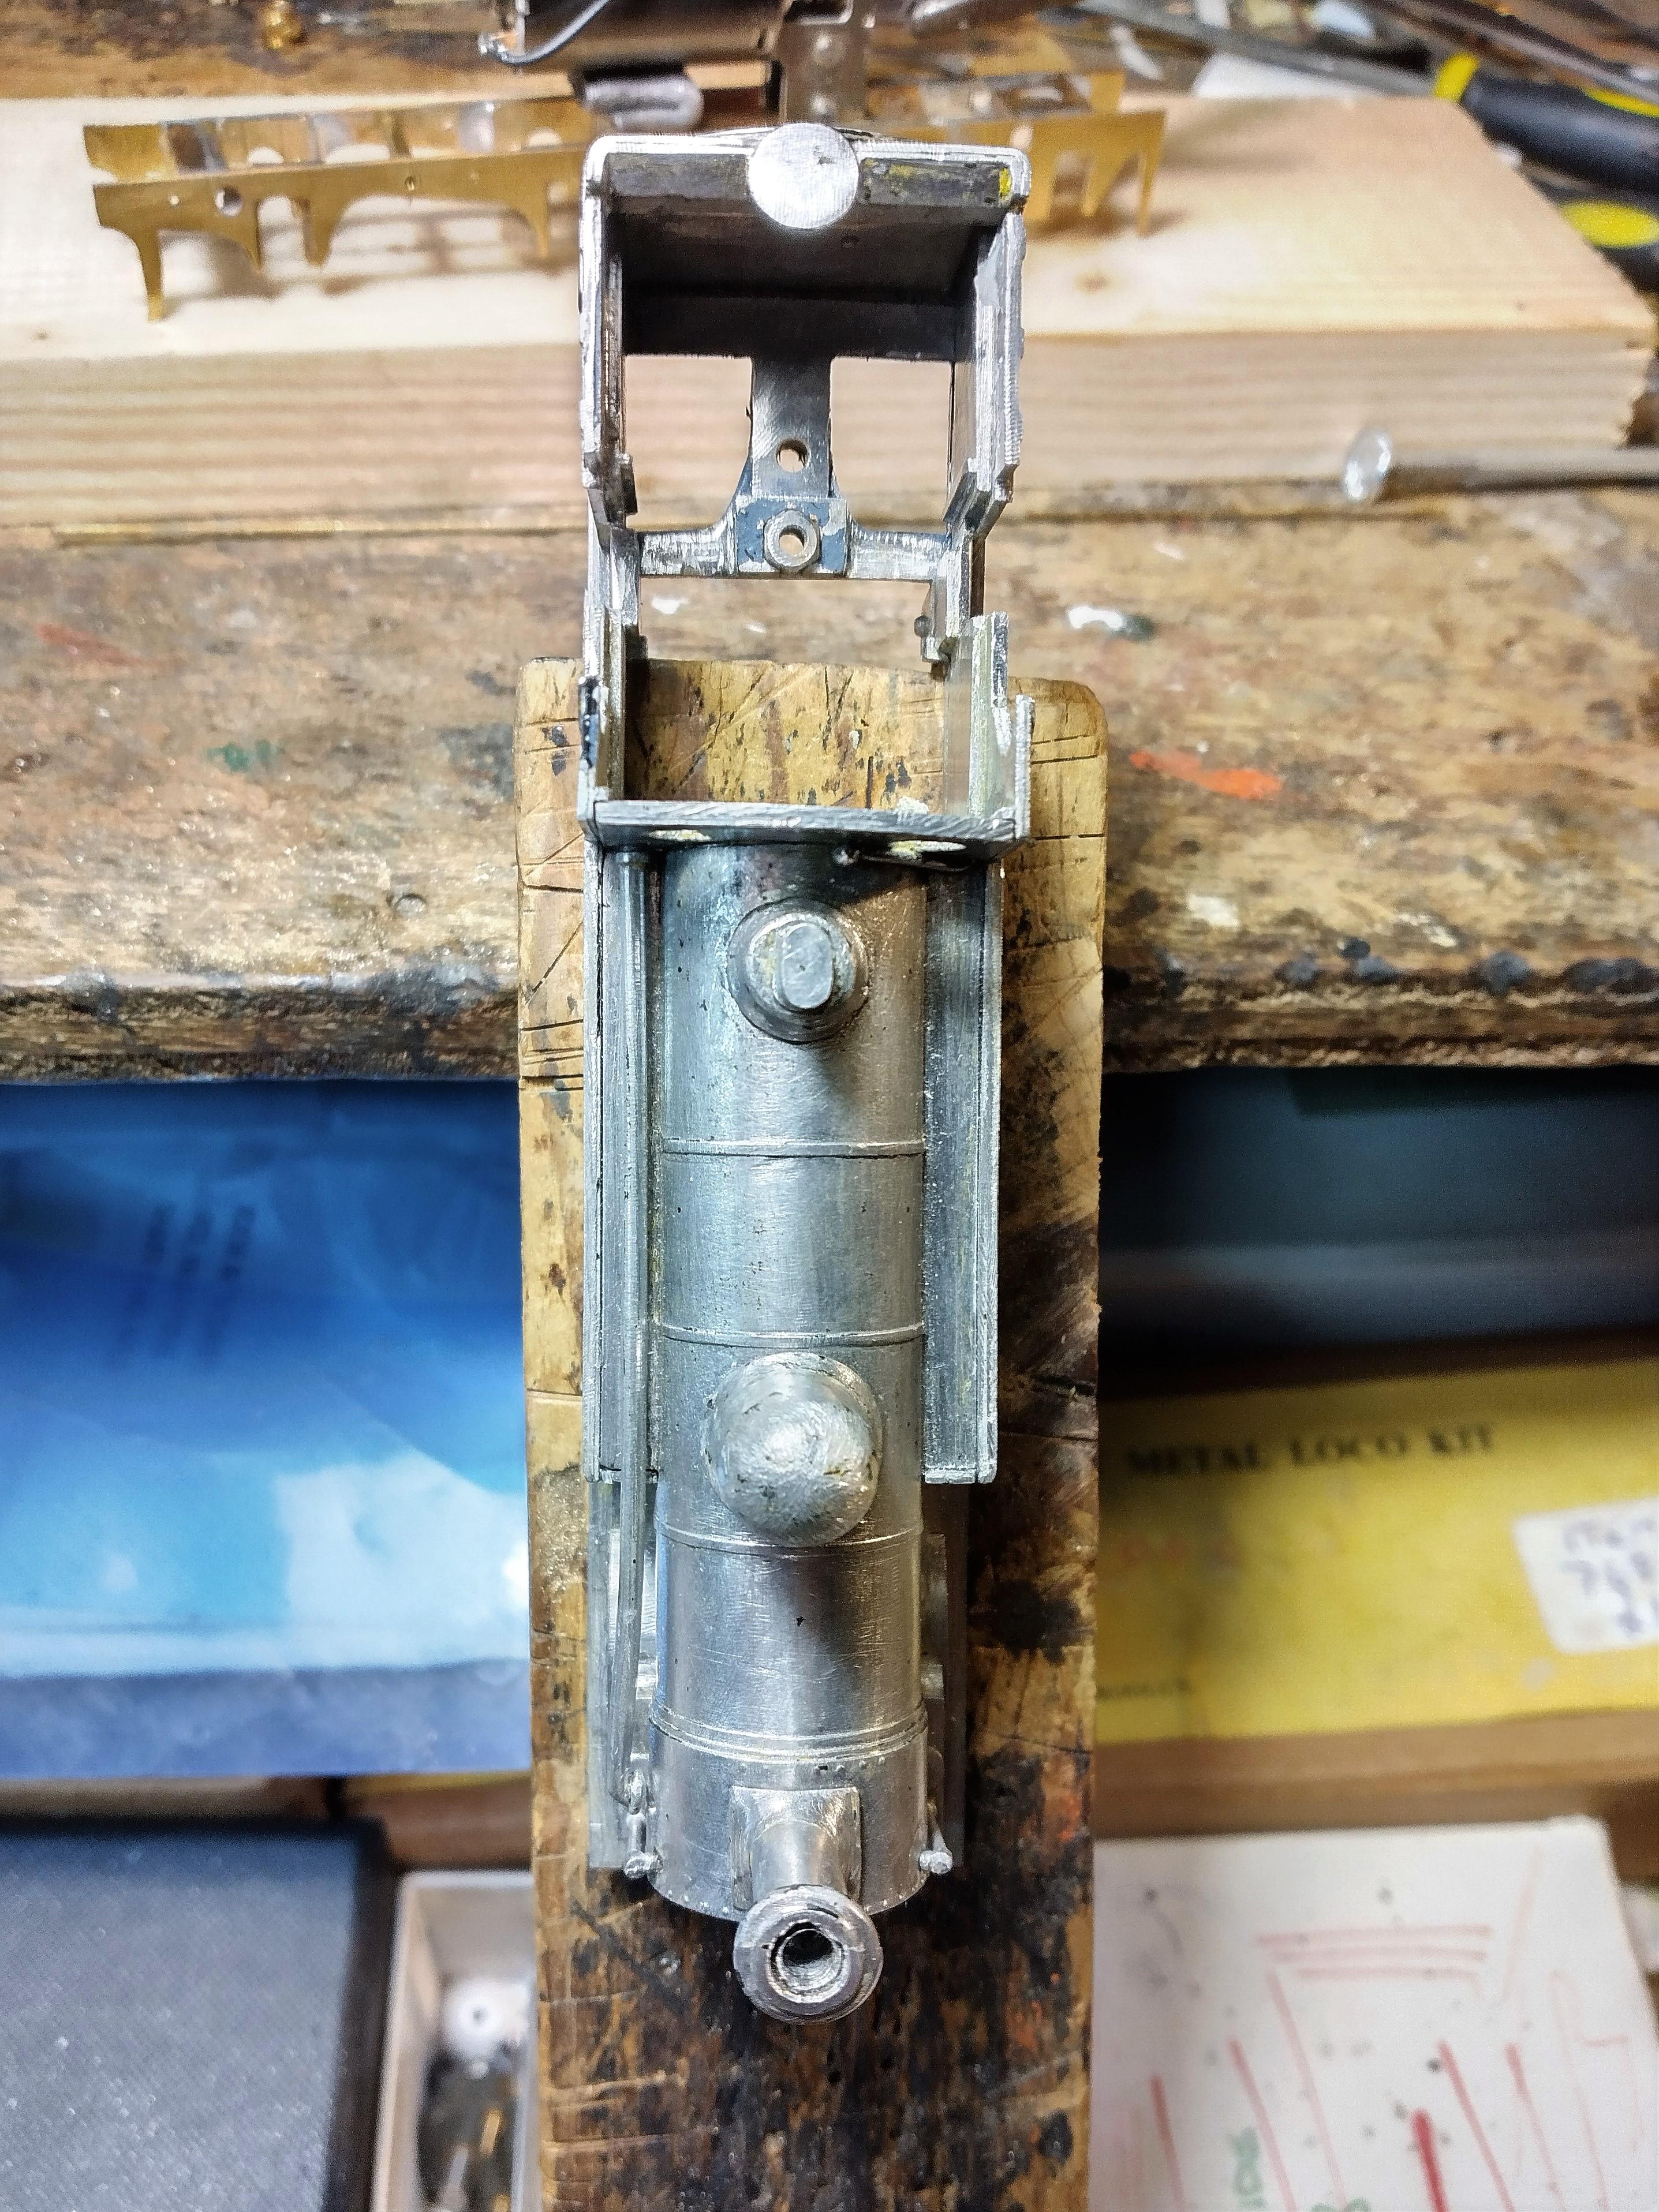
Not much to report but the loco. ran on the rolling road on our stand at the Shenfield show for some hours and is still happy, so I’m very pleased with progress. In my last post I forgot to show the firebox, which is very visible on this loco. due to the shallow frames. It was made from 10 thou brass, riveted in the GW Models press, and soldered between the frames.
-
September 30, 2022 at 7:43 pm #243077Nick RidgwayParticipant
Looking good, Stuart. Keep going!
-
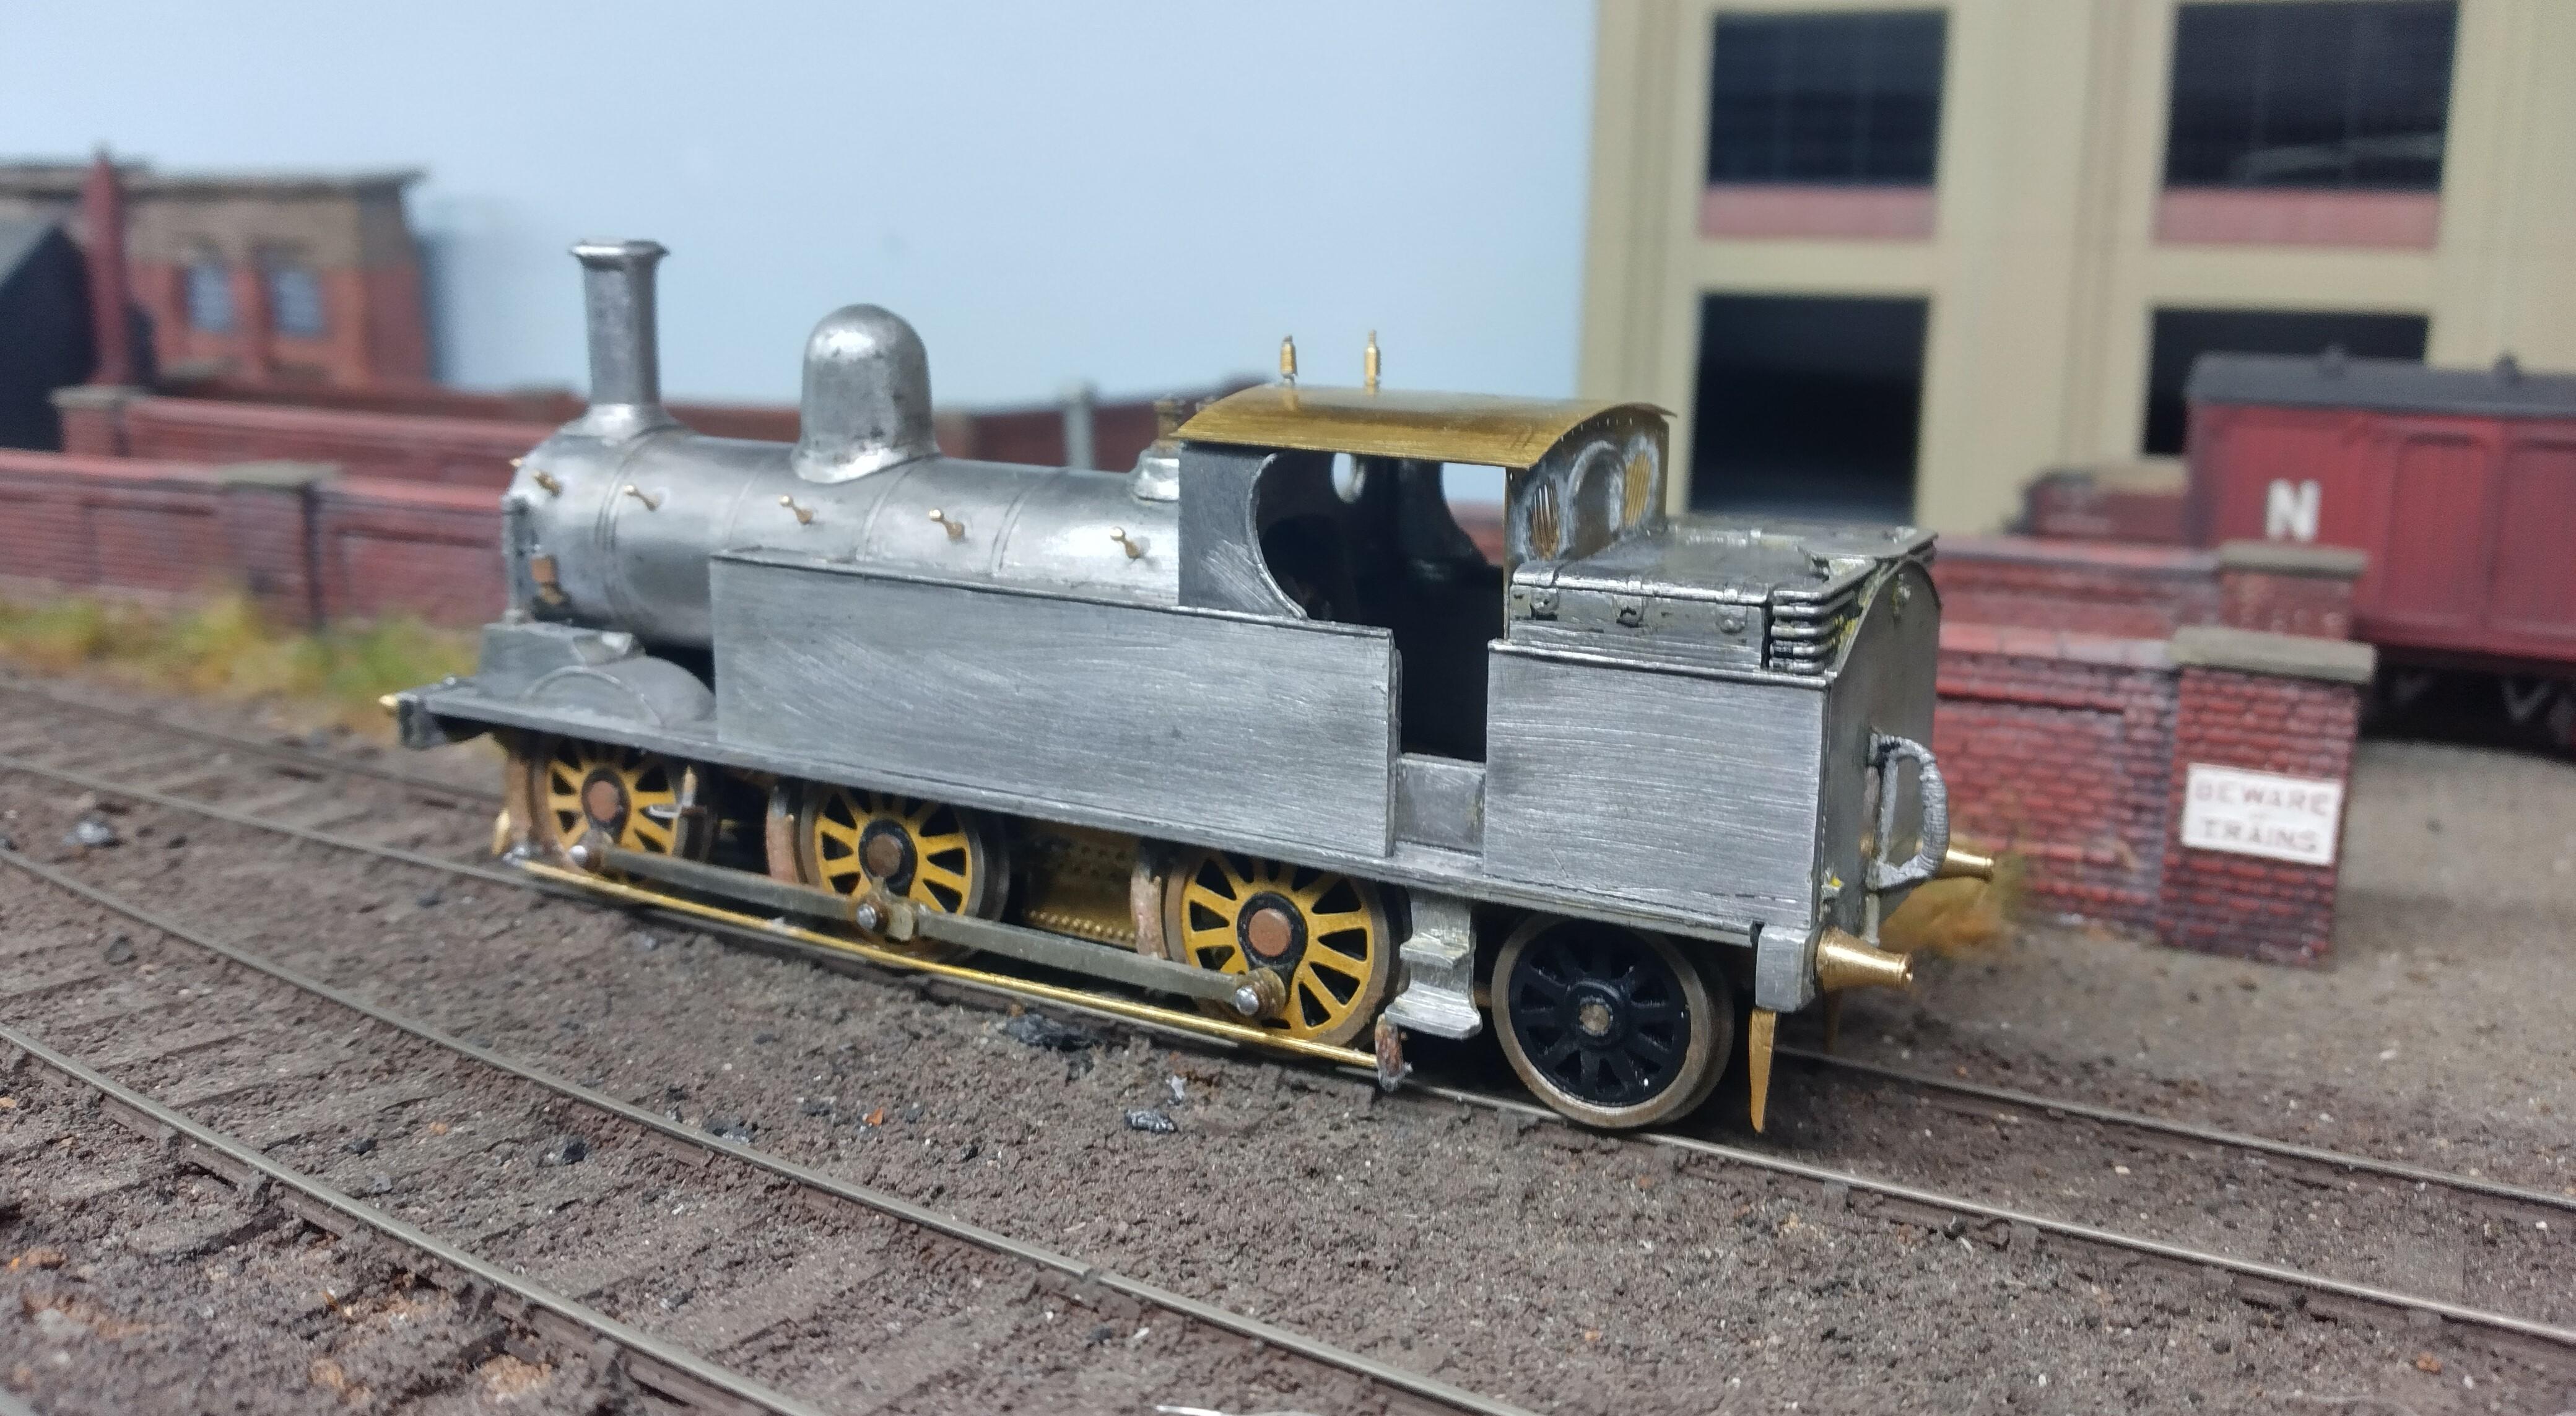
December 4, 2022 at 4:45 pm #243509Stuart FirthParticipant
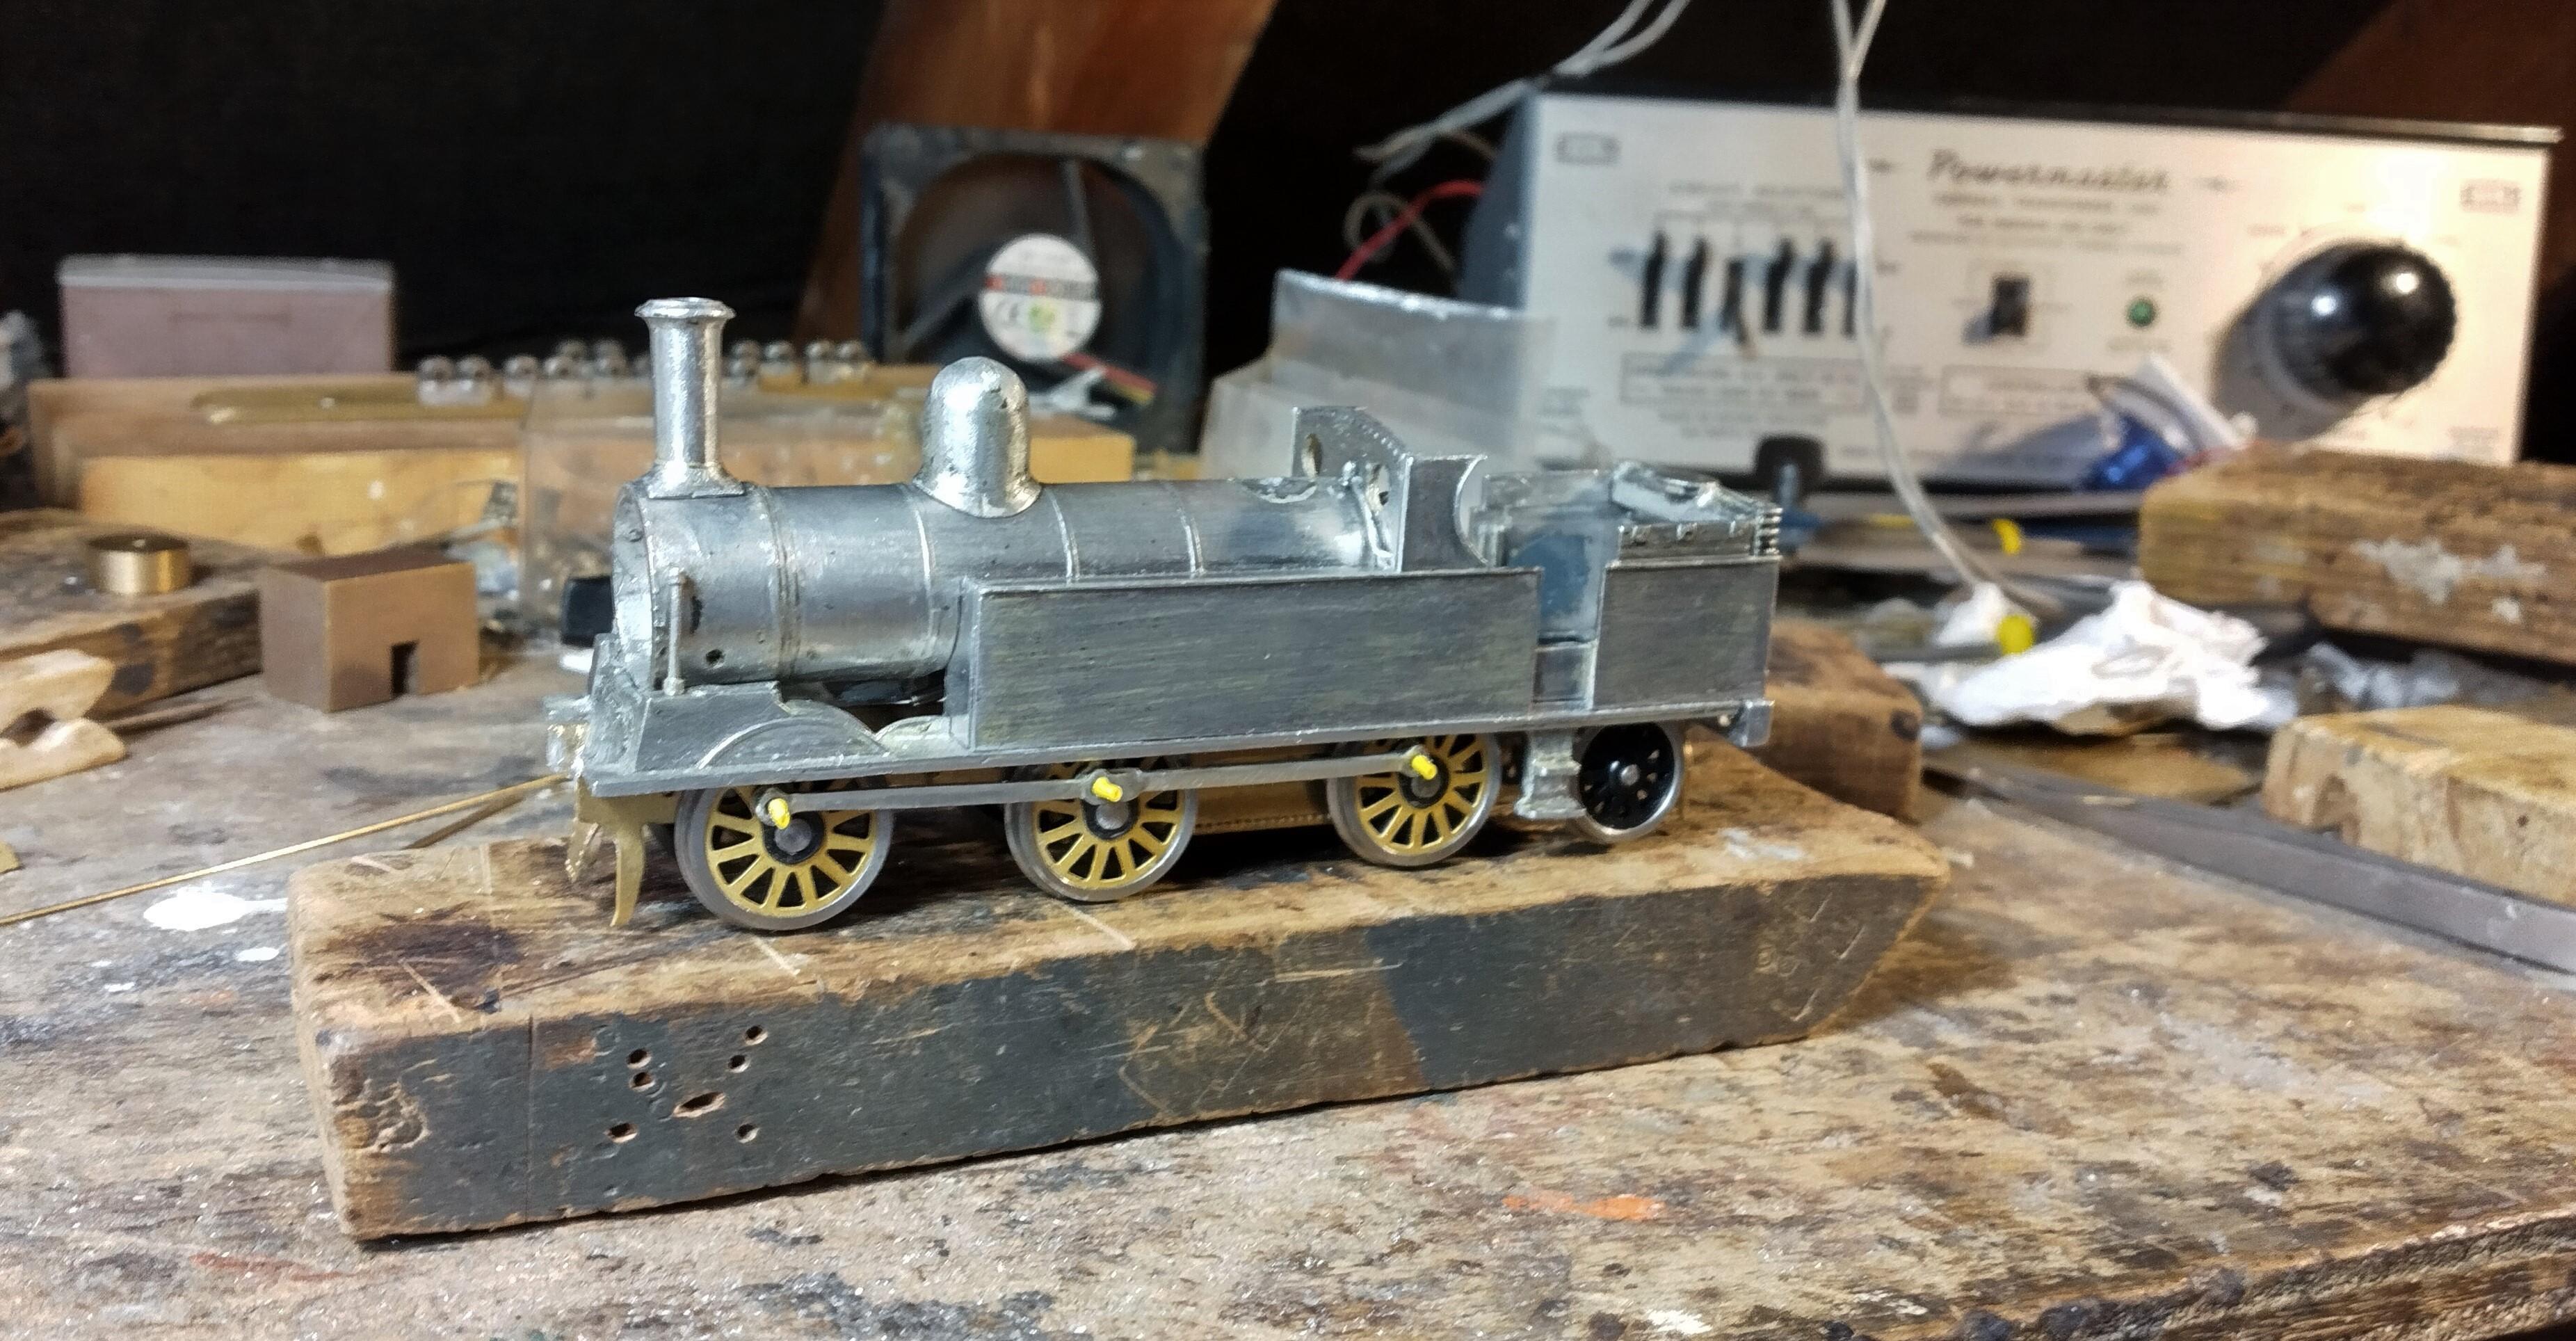
It lives! – always the most satisfying part of a build for me is fitting the pickups and seeing the loco move on the layout under its own power for the first time. The photo also shows a replacement brass rear spectacle plate as I wanted it to look like sheet steel and not armour plate. It has coal grilles from Mainly Trains via Wizard, though I had to use 5 bar as the etch doesn’t have a 4 bar version that fitted. The ventilation holes along the top edge were made as rivets in the GW Models press, which were then filed off to reveal small holes. There is a brass cab roof to go with it. The brass pivot wire I made for the trailing wheels wasn’t springy enough, so I need to find some steel or iron wire instead.
-
December 4, 2022 at 5:59 pm #243510Nigel BurbidgeParticipant
Stuart,
I am loving the way you are transforming this from an unwanted and unloved cast off into a desirable piece of modelling! It’s alway satisfying when you can apply power and the wheels turn as desired. What are you planning for the front footplate and buffer assembly?
cheers
Nigel
-
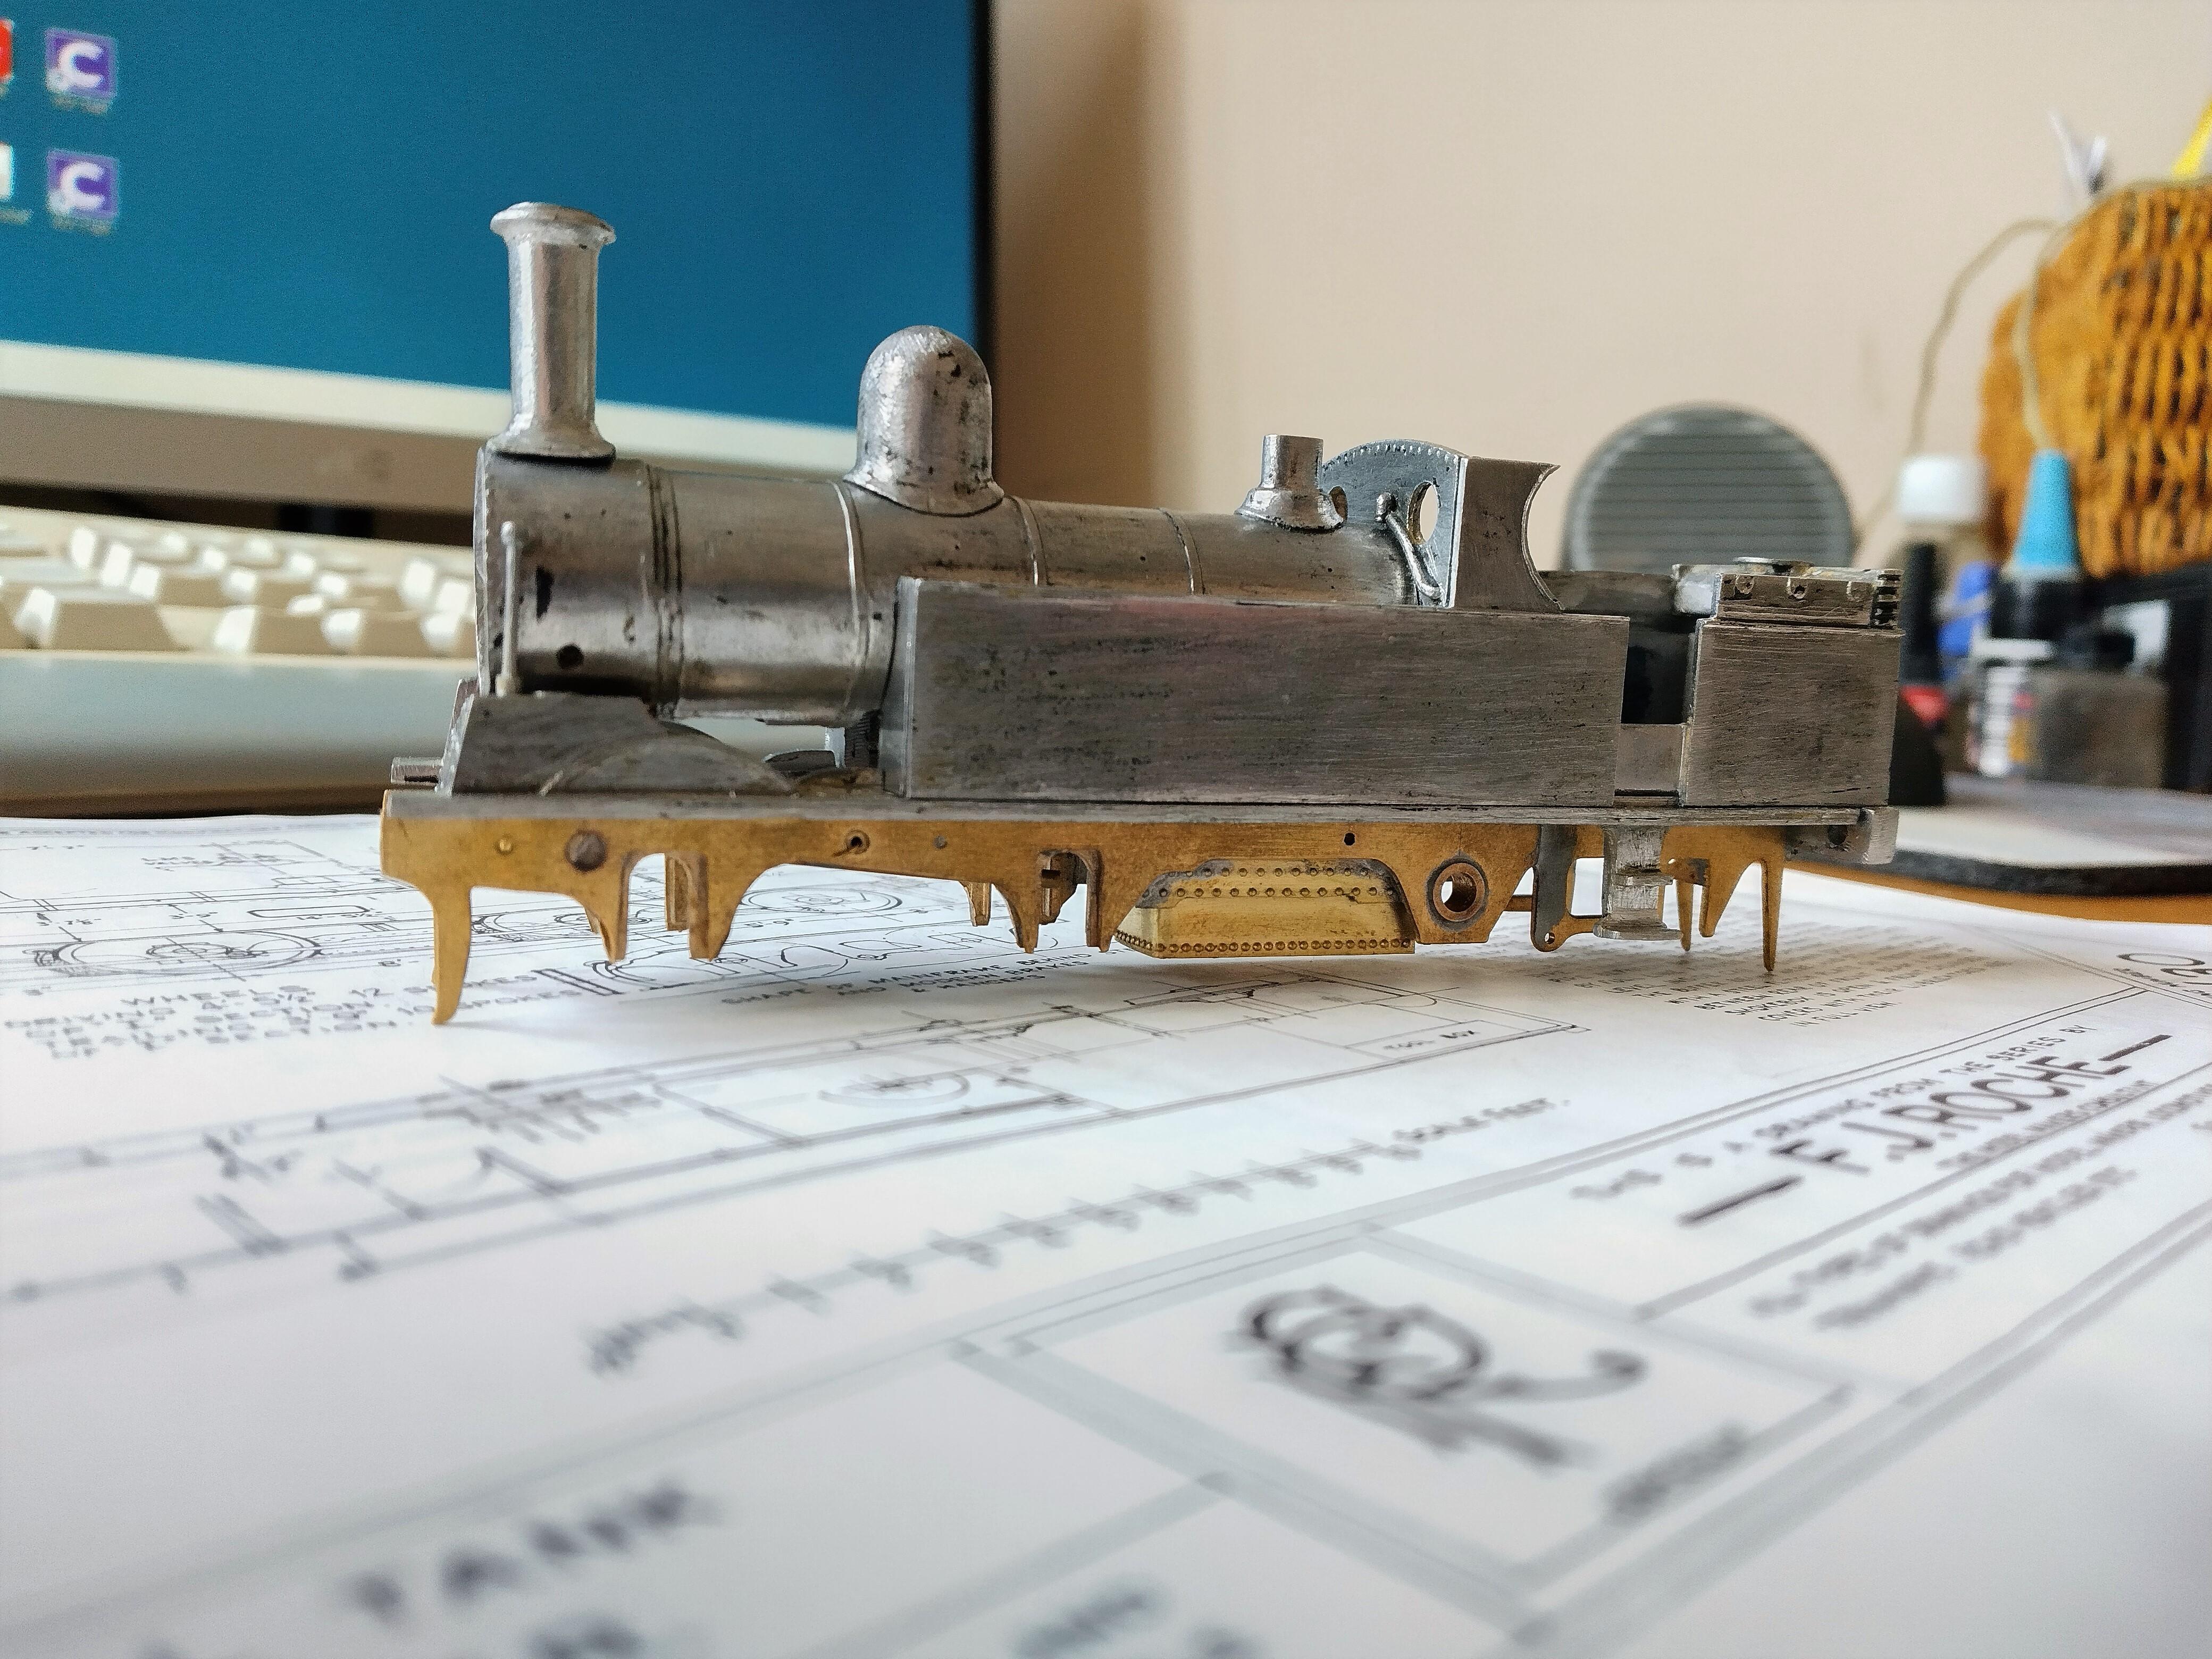
December 5, 2022 at 10:17 am #243513Stuart FirthParticipant
Hi Nigel – many thanks.
The K’s casting provides cylinder fronts, which are, of course, visible as there is no footplate in front of the smokebox. I have added the bit beneath it as part of the chassis. I’m at a loss to describe it, a kind of curved V-shape with rivets on the front. The K’s buffer beam will be re-used but I have some nice Gibson sprung buffers to go on it.
-
December 31, 2022 at 4:22 pm #243663Stuart FirthParticipant
Well at last we are nearly ready for paint. The chassis took me a lot of fiddling time, chasing down the odd intermittent short and working out how to secure the motor. Then there was dremelling inside the body to make enough clearance for the flywheel. The trailing axle runs only with its own weight, which seems to be enough on my 3′ radius curves. Some lead in the smokebox brought the centre of gravity close to the middle of the coupled wheelbase. Brakes are from the scrap box, as was the smokebox door wheel. Bowen Cooke buffers by Gibson. Safety valves are Tri-ang. The other odds and ends slowly added up, and there is a simple cab interior from a London Road Models casting and some plasticard. Time to quit while I’m ahead and the loco is still running. A prototype has been identified which was at Edge Hill in 1947 and wasn’t motor fitted as far as I can tell. I have never gotten the hang of soldering white metal so that front buffer beam is super-glued on and I will forever be expecting it to fall off!
-
December 31, 2022 at 4:36 pm #243664Nick RidgwayParticipant
Looking good, Stuart. Keep going, as it’s nearly there.
With whitemetal, it is possible, with care, to weld the larger components together with a smouldering iron.
BTW, I’m Nellie looking forward to the next project loco; it will be extraordinary. 😉
-
January 1, 2023 at 7:26 pm #243671Nigel BurbidgeParticipant
Yes, I’m with Nick on this; it is looking very good and shows how some of the early white metal kits can be rejuvenated so that they can hold their own with more modern kits. Looking forward to seeing the painted article!
-
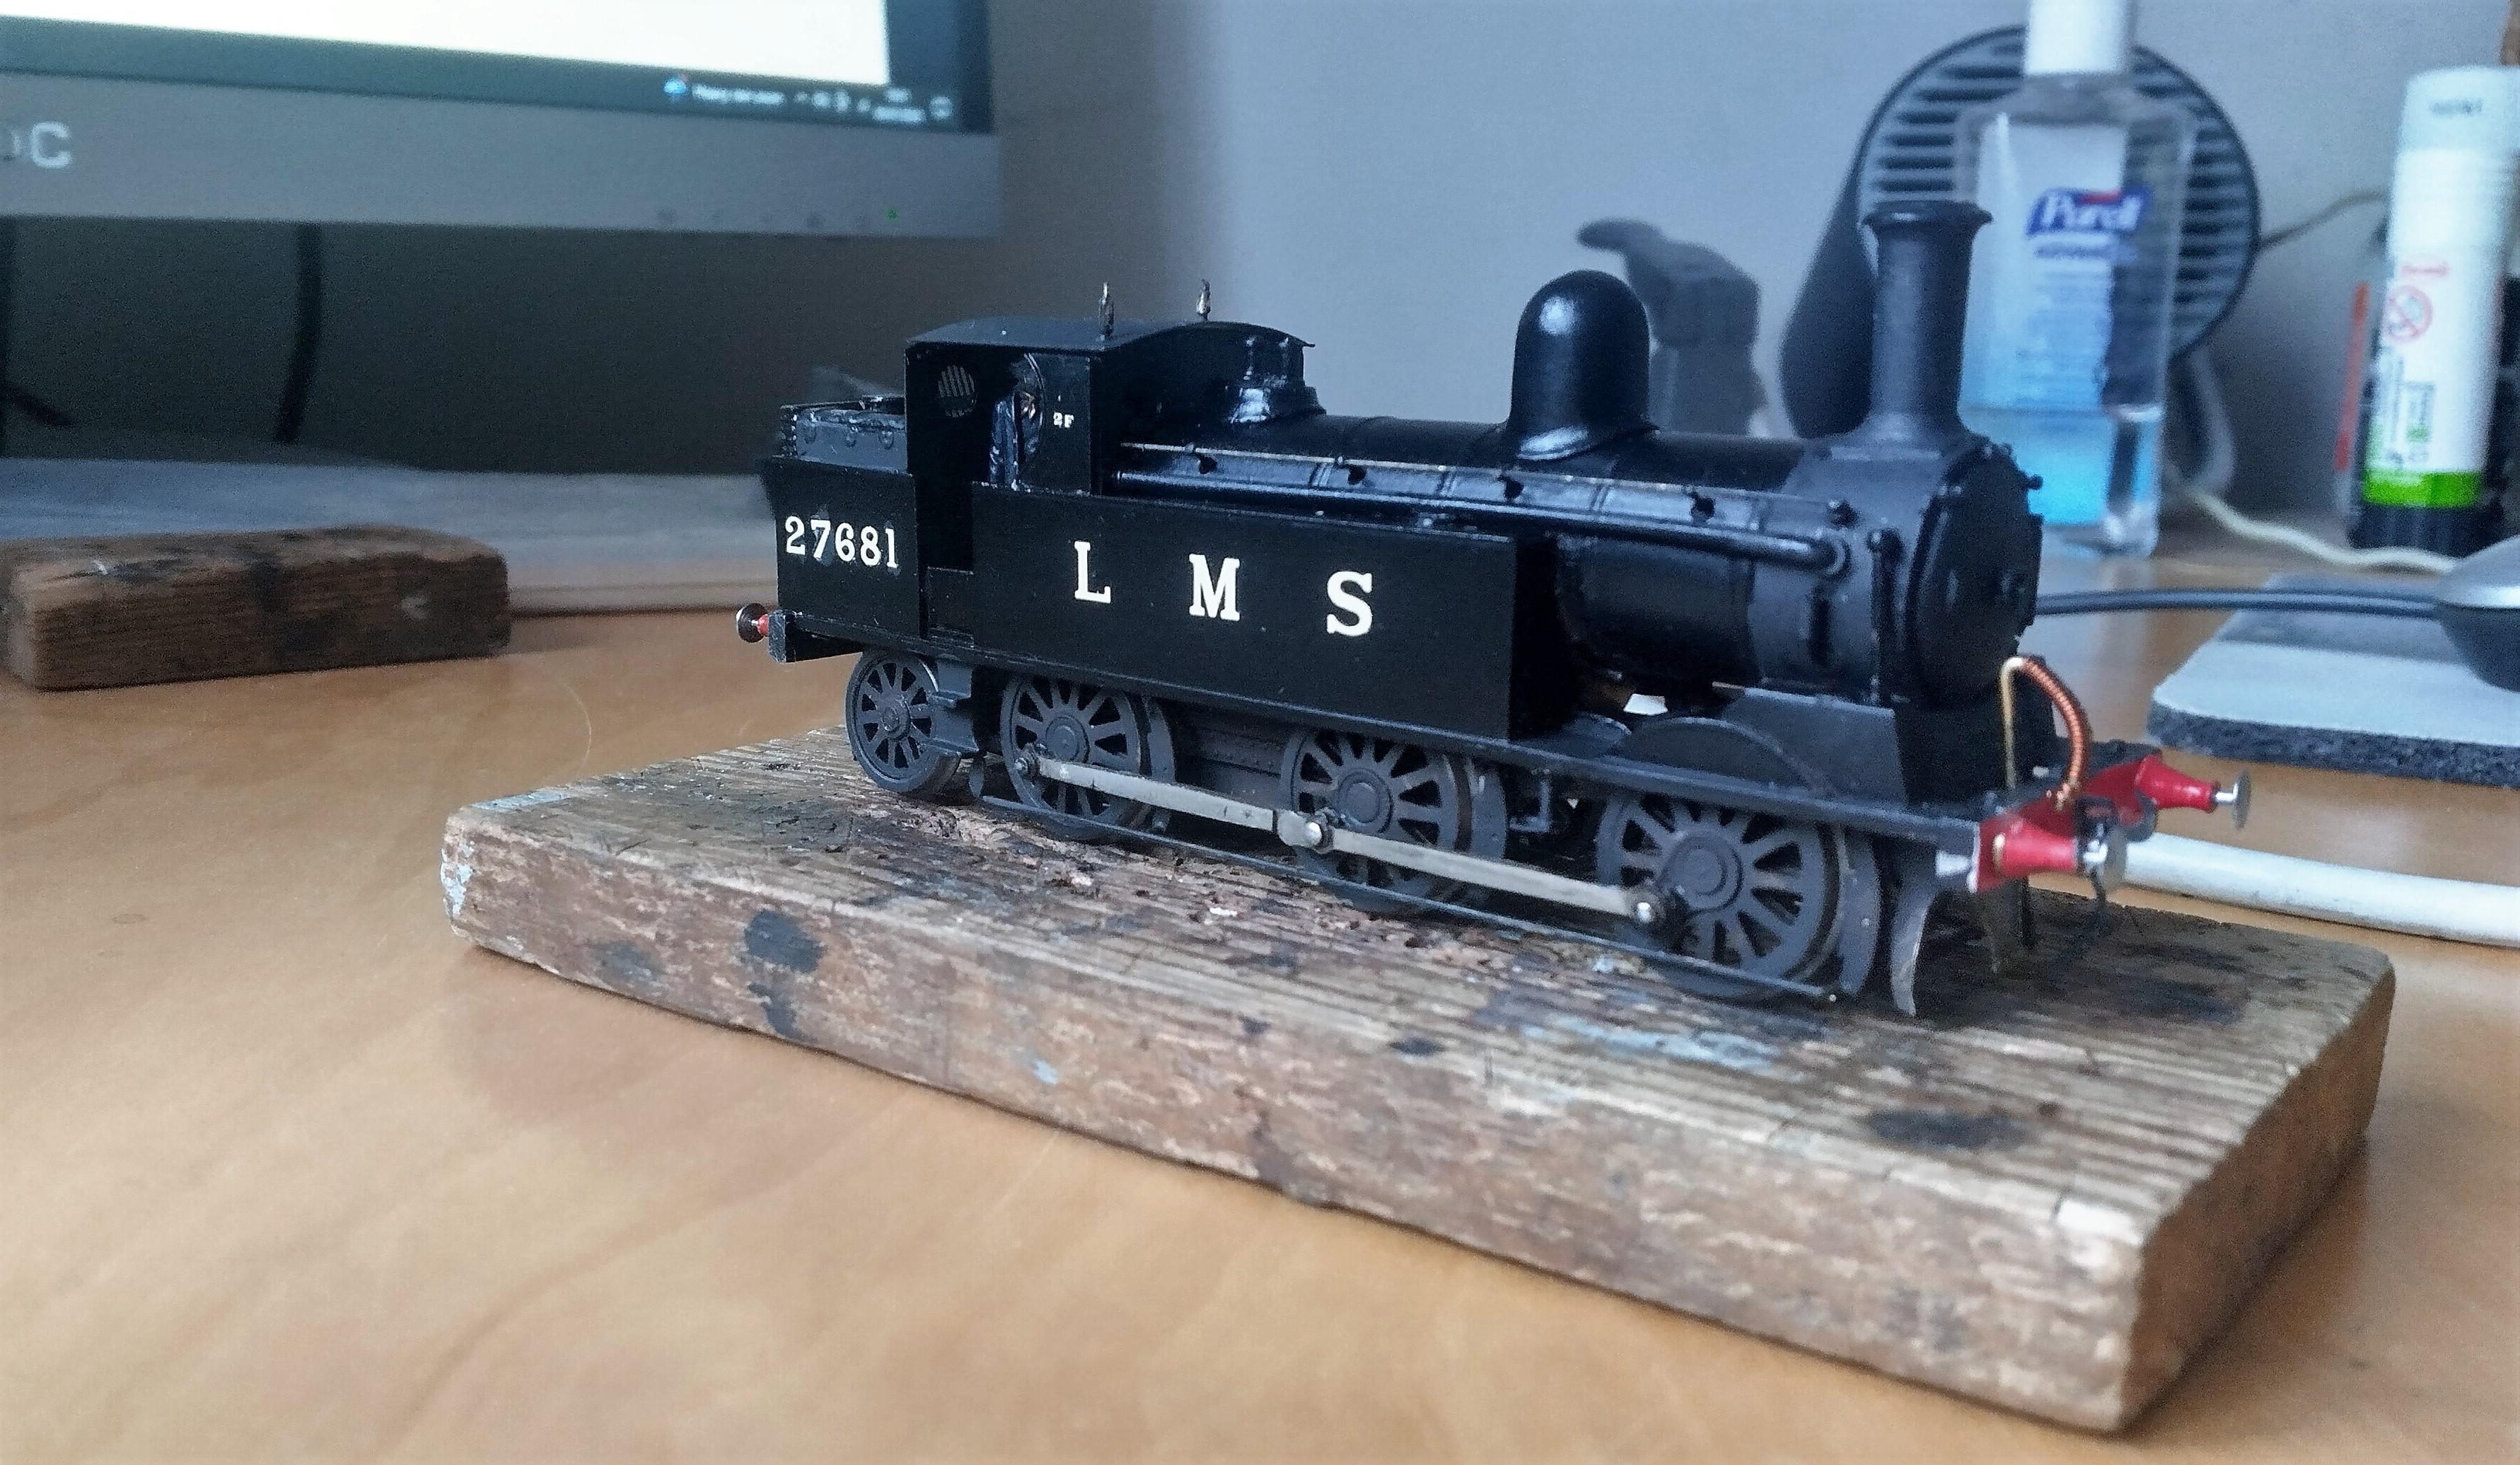
January 3, 2023 at 10:51 am #243678Stuart FirthParticipant
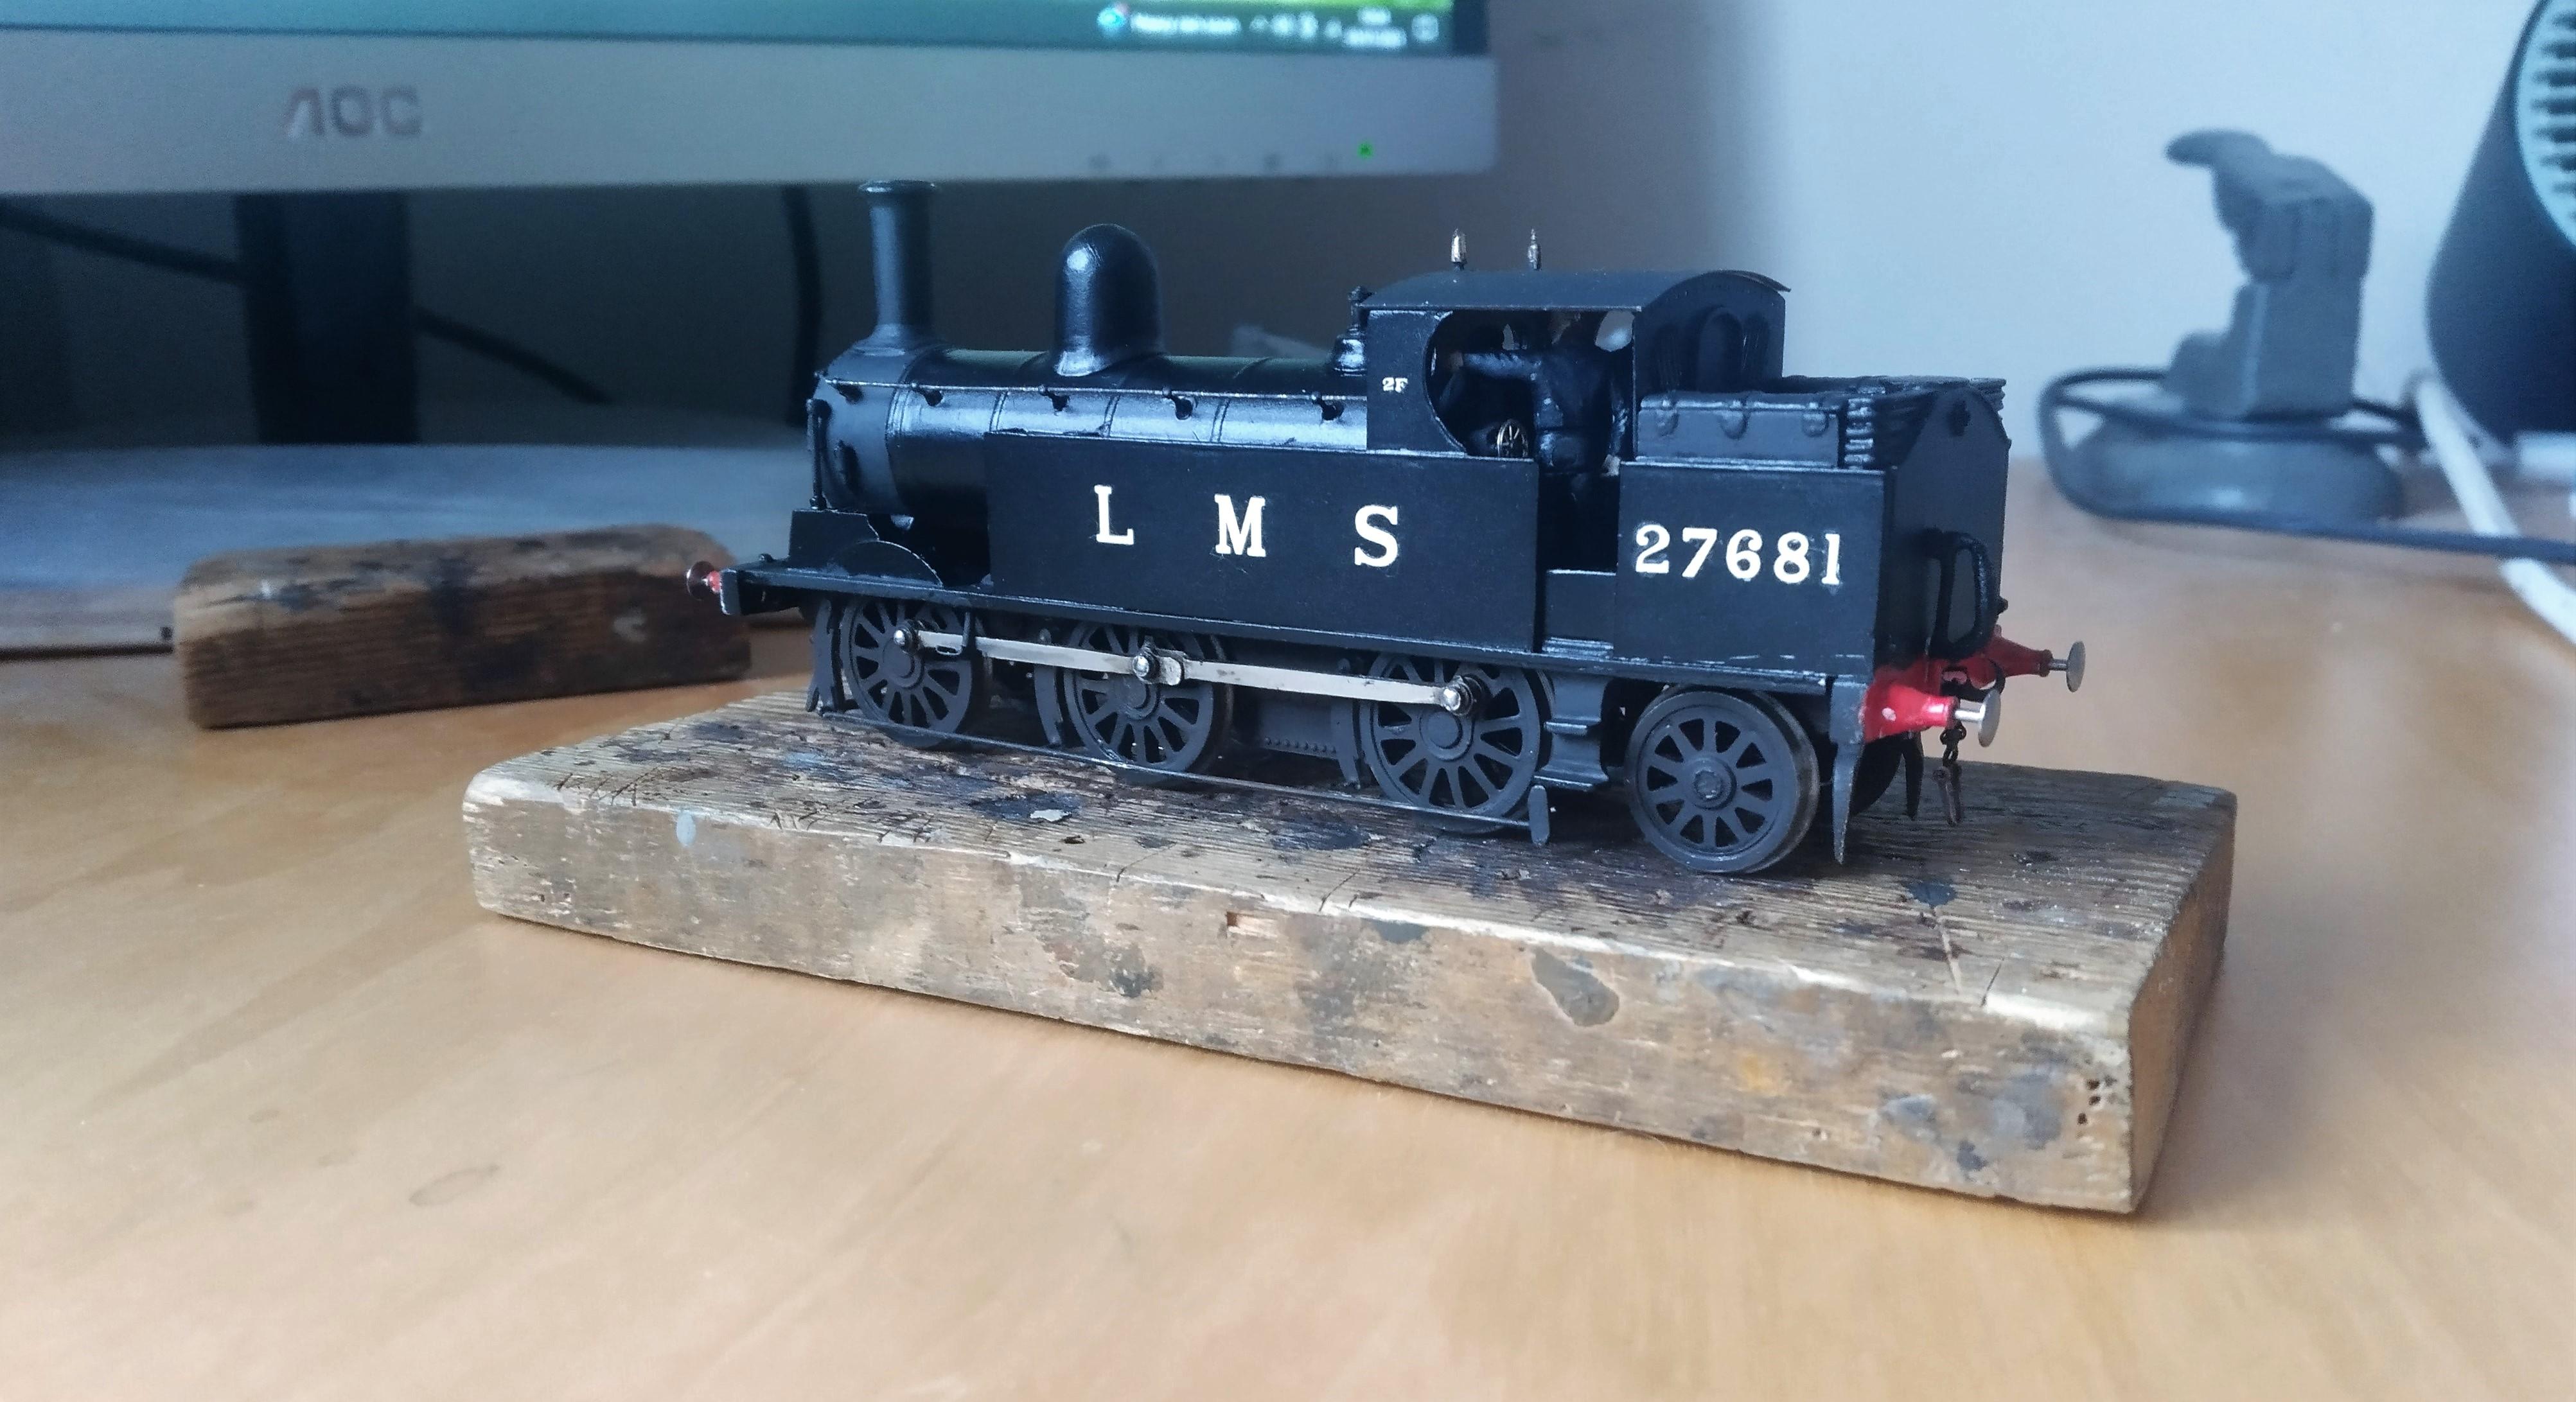
I hadn’t meant to progress so quickly but whilst in the garage applying a coat of Halfords red oxide primer I noticed I had a can of their satin black as well. I have used this successfully in the past so just went for it. After a couple of days the other colours were added, then the lettering, HMRS Pressfix in the ‘Crewe Straw’ style. Lacking sufficient smaller numbers I resorted to an older sheet that had a price tag of £2 ! This was from Karlgarin Models in Chelmsford, and I think the shop closed in the late ’80’s so I have had them a while, and no surprise they had no tack at all. In the end I resorted to soaking them off their backing paper then dipping them in Humbrol ‘clear’ matt varnish, before placing them onto the loco. Amazingly it worked. A week or so for everything to harden off and then it will have to suffer weathering – I am loathe to do it as I like the clean black look but it’s not very prototypical. Looking at the photo’s I realise that I haven’t yet added the smokebox handrail or the steam heat pipes.
-
January 3, 2023 at 1:22 pm #243679Nigel BurbidgeParticipant
Lovely job Stuart!! I like the way you managed to revive the transfers. I also remember the old Karlgarin Models before I moved away from Essex; it seems a world away now.
-
January 3, 2023 at 4:19 pm #243680Nick RidgwayParticipant
Good stuff, Stuart!
-
January 8, 2023 at 3:48 pm #243719Stuart FirthParticipant
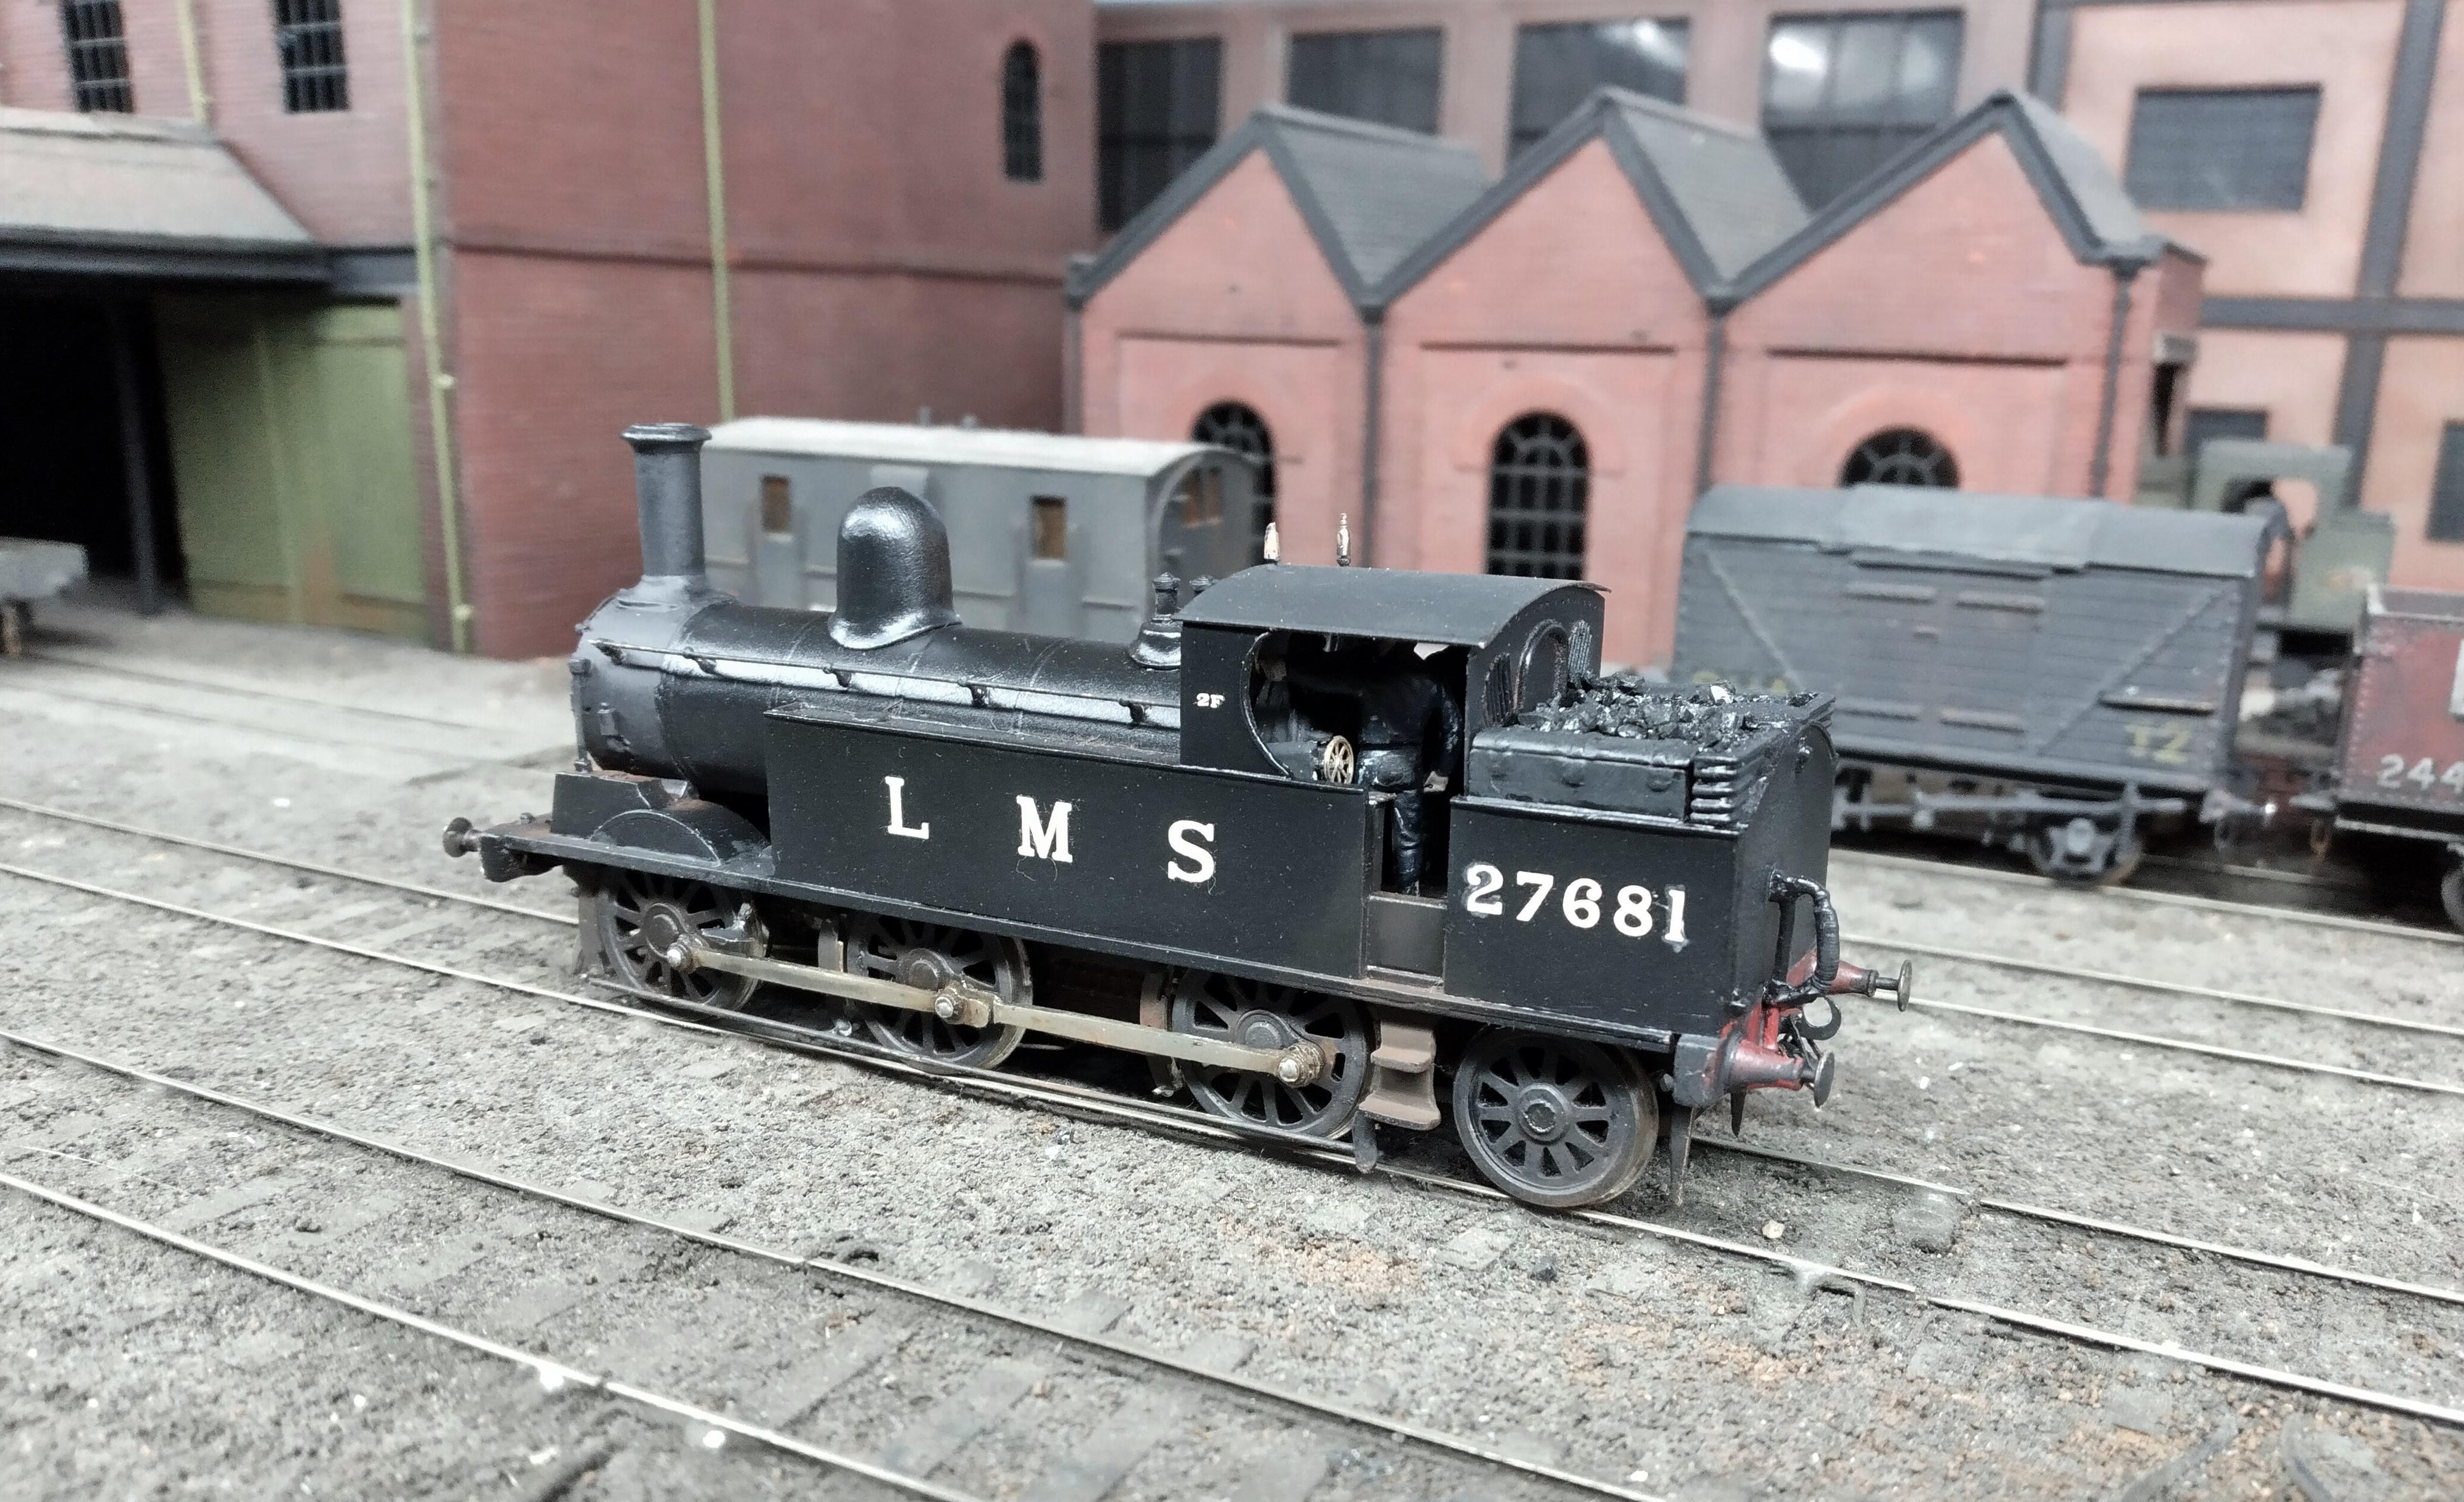
Thanks chaps – finally finished. I couldn’t bear to do my usual industrial weathering job so it has stayed very clean.
-
January 8, 2023 at 8:34 pm #243723Nick RidgwayParticipant
Nice one, Stuart! Lovely job. 👍🙂
-
-
AuthorPosts
- Only logged in EMGS members can reply to this topic